PERMISSIONS Administrator or Super Administrator privileges in Workplace
NAVIGATION Workplace Online > Configuration > Branding
When we first activate your Workplace site, default logos and color themes will be applied to your site and to your interfaces for Workplace Online, Workplace Desktop, Workplace Server, Workplace Mobile, and all emails generated by the system.
On the Branding page, you can apply your own branding to your team Workplace interfaces and emails at any time. You can even create a custom Workplace URL for your Workplace users.
You can set color theme and logo defaults to apply to all Workplace interfaces, or you may customize these items for each interface (Online, Desktop/Server, and Mobile) individually. Emails will display the logo you select, but will not be affected by color scheme changes.
NOTE Workplace Desktop and Server will display the branding changes. If you do not see the changes within 15 minutes, quit and relaunch the application.
Workplace Mobile for iOS requires a login event to trigger the branding changes (log out within Workplace Mobile, or upgrade Workplace Mobile, or force quit and relaunch Workplace Mobile).
Workplace Mobile for Android must be re-opened for the branding changes to show.
The Branding page also allows you to customize the logo and other text for activation, alert, and notification emails sent from Workplace in multiple languages.
The team name you enter on this page will be visible to your users in their Workplace Online interface and when they click on support links in Workplace. You can also customize the support information displayed in your users' Settings area.
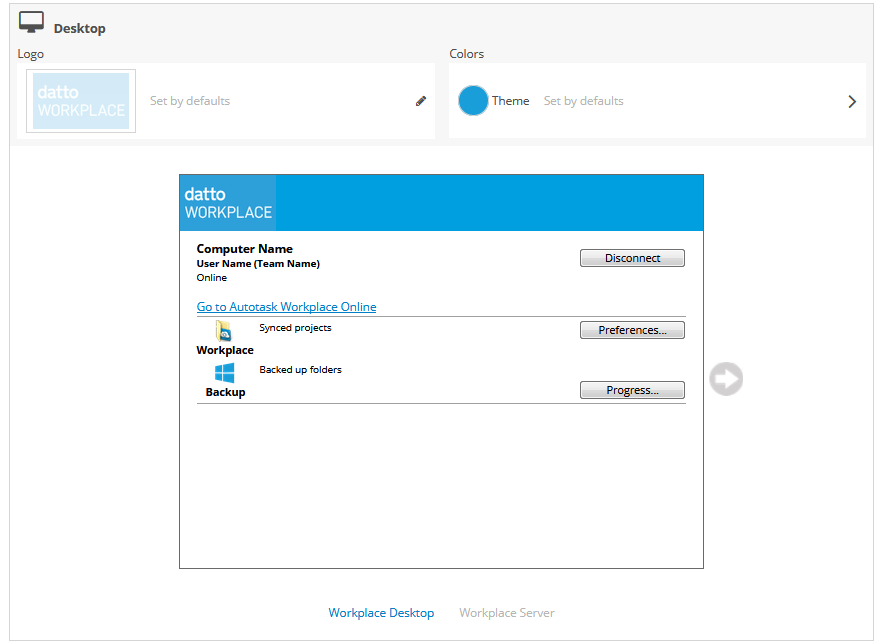
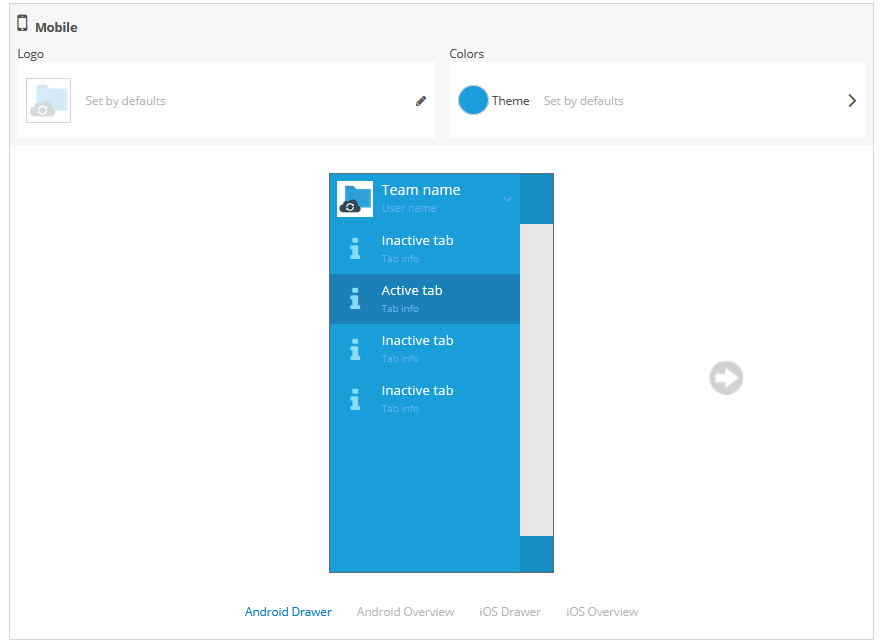
This page provides detailed previews of your changes, so you'll know exactly what you're changing and what your users will see.
How to...
|
- Click Save. If the subdomain you entered has already been reserved, a message will appear. Enter another and click Save again.
NOTE Your service provider may provide their own custom URL. In that case, your team can access Workplace place via the default URL, your service provider's custom URL, or your own custom URL.
NOTE To release your custom URL from reservation, click the Reset button.
NOTE Unless a different logo is defined for a specific platform or area, the default rectangular logo will display in Workplace Online, Workplace Desktop, Workplace Server, and on system-generated emails, and the default square logo will display in Workplace Mobile and the linked teams menu in Workplace Online.
- Scroll to the logo you want to change and click the
 icon to open the logo editor popup associated with it:
- To select a new logo, click Browse.
- Browse to the location of the .jpeg, .gif, or .png file you want to use as the new logo. Image ratios and dimension recommendations are listed below. Workplace will automatically scale down larger images:
| Type | Logo Use | Ratio | Recommended Dimensions (in px) |
|---|---|---|---|
| Default | Rectangular | 12:7 | 168 x 98 |
| Square | 1:1 | 256 x 256 | |
| Online | Team | flexible | 98 maximum height |
| Login | flexible | 98 maximum height | |
| Team icon | 1:1 | 32 x 32 | |
| Desktop (applies to Server as well) |
Logo | 12:7 | 108 x 63 |
| Mobile | Logo | 1:1 | 256 x 256 |
| Logo | flexible | 98 maximum height |
- Optionally, crop the uploaded logo by adjusting the crop guidelines on the image. The image preview will reflect your changes.
- Click Save in the popup window.
- Click Save on the Branding page to apply your changes.
TIP If you are changing the logo for a specific interface, remember to click the links under the preview pane to see the logo on different pages.
NOTE Unless a different color theme is defined for a specific platform, the default color theme will be applied across all platforms.
- Scroll to the color theme you want to change and click the arrow on the right side of the Theme section to display the color selector:

TIP If you are selecting your default color theme, the ![]() icon appears on the system default color swatch, which is medium blue. If you are selecting a color theme for a specific interface, the
icon appears on the system default color swatch, which is medium blue. If you are selecting a color theme for a specific interface, the ![]() icon appears on the color swatch of the default color theme you have selected if it is different from the system default.
icon appears on the color swatch of the default color theme you have selected if it is different from the system default.
- To select a predefined color theme, click a color swatch to select a theme based on that color.
To select a theme based on a custom color, click the multicolored swatch and enter a hex code or move the slider in the rainbow bar and place your cursor in the square box to select the hue and color depth. Then click Select.
TIP If you are changing the color theme for a specific interface, remember to click the links under the preview pane to see the theme on different pages.
- Click Save.
| Field/Section | Description |
|---|---|
| Team logo |
This logo will be visible to your users in the upper left corner of their Workplace Online interface. To edit, please refer to Change a logo. |
| Team icon |
This logo will appear in the Linked Team menu in Workplace Online. To edit, please refer to Change a logo. |
| Login logo |
This logo will be visible to your users on the Workplace Online login page. To edit the logo, refer to Change a logo. |
| Colors (Theme) |
This theme will determine the display colors for Workplace Online. To edit, please refer to Change a color theme. |
- Review your edits in the preview pane to the right.
TIP Remember to click the links under the preview pane to see your changes on different pages.
- Click Save.
NOTE Branding display in Workplace Desktop and Desktop Server requires version 7.2 or later.
| Field/Section | Description |
|---|---|
| Logo |
This logo will be visible to your users in the Workplace Desktop and Workplace Server interfaces. To edit, please refer to Change a logo. |
| Colors (Theme) |
This theme will determine the display colors for Workplace Desktop and Workplace Server. To edit, please refer to Change a color theme. |
- Review your edits in the preview pane to the right.
TIP Remember to click the links under the preview pane to see your changes in both Workplace Desktop and Workplace Server.
- Click Save.
NOTE Branding display requires Workplace Mobile 2.3 or later.
| Field/Section | Description |
|---|---|
| Logo |
This logo will be visible to your users in the Workplace Mobile interface. To edit, please refer to Change a logo. |
| Colors (Theme) |
This theme will determine the display colors for Workplace Mobile. To edit, please refer to Change a color theme. |
- Review your edits in the preview pane to the right.
TIP Remember to click the links under the preview pane to see your changes in different operating systems.
- Click Save.
-
This logo will be visible in the system-generated emails sent automatically from Workplace. To edit the logo, please refer to Change a logo.
- Click the Add a new language link.
- Click a language to select it.
- Click an email type to customize it. The default email message for that message type will be displayed in the preview pane. The following emails may be customized:
| Email Type | When do users get this email? | Customizable Fields |
|---|---|---|
| Activation Email | Users will receive this email when their Workplace account is created. They must click the button in the email to activate their Workplace account. |
Sender |
| Alert Email | Users will receive this email when Workplace sends them an alert message informing them of action that they need to take, or critical Workplace-related information such as a password reset. |
Sender |
| Notification Email | Workplace uses this email for system-generated communications, such as when an item is shared with a user, when a comment is added, when a scheduled report is delivered, etc. |
Sender |
- Repeat steps 4 - 5 for each language you wish to add. To remove a language, click the X icon to the right of it.
- Click Save.
- Click the Reset to Default Branding button.
- Click Reset Default Branding in the confirmation popup.


