PERMISSIONS Full Access or Team Access privileges in Workplace Manager
NAVIGATION
Please read this...
This article is a supplement to the Active Directory integration guide. Only continue with this article after reading the Active Directory integration guide, and when you have a clear understanding of the integration functionality.
This article explains how to integrate with Active Directory using the Entra ID method specifically.
About Entra ID
The Entra ID integration is a way of integrating Workplace with Microsoft (Windows) Entra ID. This integration allows users and groups to be synced from Entra ID. Once configured and enabled, users can authenticate with their Active Directory credentials and keep their email address, telephone number and name synchronized with Active Directory.
Before you begin
- The Active Directory integration guideshould be read in full prior to implementation of this integration.
- The implementation requires information from Microsoft Entra ID. Please see the Entra ID configuration supplement for this information.
Requirements
- An Entra ID administrator account
- An Entra ID Active Directory service
- Application ID, API Key, and Authentication domain from Entra ID
- A Workplace administrator account
IMPORTANT If you are using the Entra ID method for your Workplace AD integration, we strongly recommend that you enable the SSO integration as well. This will allow users to access and/or install Workplace when MFA is enabled on their Entra ID accounts.
NOTE Workplace does not support multiple Entra ID SSO apps under the same Entra ID AD instance, unless the Workplace accounts are in different geographic regions (URL when logged in shows the same domain prefix, i.e. us, eu, au,ca). For more about regions and IP addresses, please refer to Workplace ports and IP addresses.
How to...
The Entra ID integration is quick and easy to set up:
- Log in to Workplace Online as an administrator.
- Go to Configuration > Integrations > Active Directory tile > Manage button > Configure button.
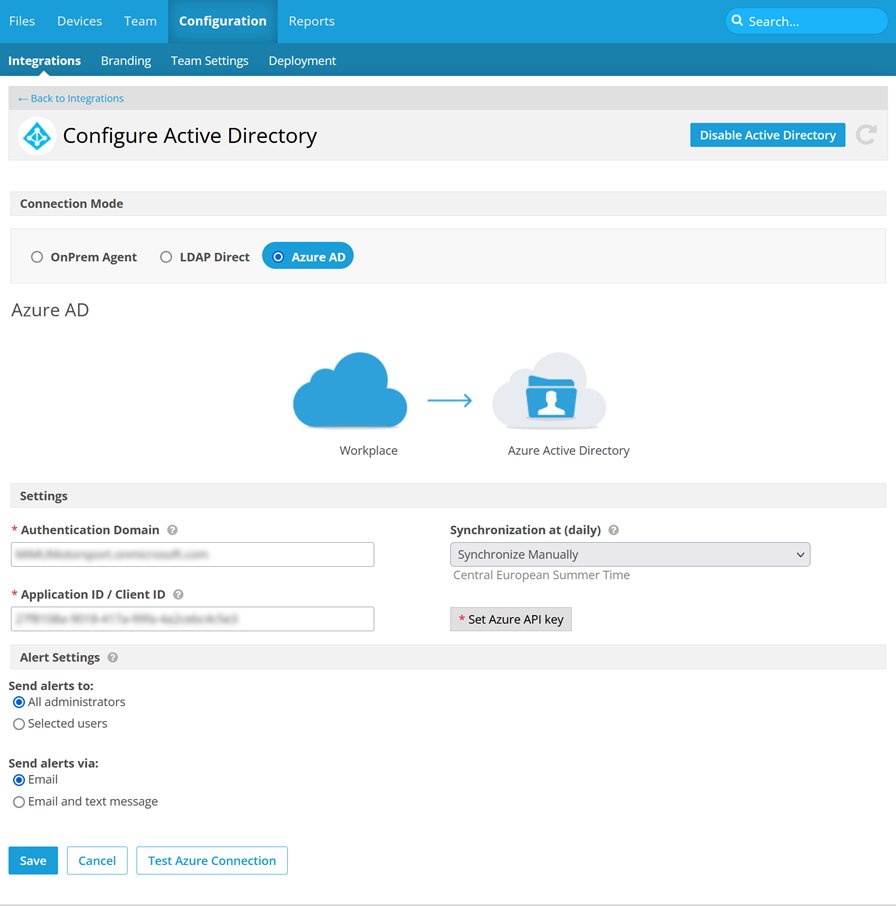
- Select the Azure AD option.
NOTE If an Active Directory integration is already enabled, click Configure to choose between the connection modes.
- Complete the following fields:
| Field | Definition |
|---|---|
| Authentication Domain | Enter the domain of the WAAD (refer to Entra ID configuration supplement) |
| Synchronization at (daily) | Select the time of day that Workplace syncs with Microsoft Entra ID |
| Application ID/Client ID | Enter the Entra ID Application ID (refer to Entra ID configuration supplement) |
| Set Azure API key | Click Set Azure API key, then enter the Entra ID API key (refer to Entra ID configuration supplement) |
| Send alerts to: |
The selections/entries you make here control who will be sent a notification in the event of an Active Directory alert. In the Send alerts to: section, select the All administrators or Selected users radio button. If you choose Selected users, enter the name or email address of an administrator in the field below the radio buttons, or click the IMPORTANT If you choose Selected users and do not select any administrators in the associated field, no one will receive Active Directory alert messages, so it's very important to select one or more recipients. |
| Send alerts via: | These radio button determine in what manner alert recipients will be notified of Active Directory alerts. Select either Email or Email and text message. |
-
Click Test Entra ID Connection.
NOTE Errors returned from Entra ID will be displayed, making it easier to identify the cause of a failed connection test.
Integration setup is now complete. Users and groups can be provisioned, as detailed in the Active Directory integration guide.
NOTE Please note that group names cannot exceed 100 characters.
- Log into Workplace Online.
- Go to Configuration > Integrations > Active Directory tile > Manage button > Configure button > select the appropriate AD method radio button.
- Scroll to the bottom of the page for the Alert Settings area.
- In the Send alerts to: section, select the Selected users radio button.
- Enter the name or email address of an administrator in the field below the radio buttons, or click the
 icon to use a data selector. If Workplace identifies an email address as a Workplace user, it will appear in blue. All other email addresses, including the support email address, will appear in orange.
IMPORTANT If you have chose Selected users and do not select any administrators in the associated field, no one will receive Active Directory alert messages, so it's very important to select one or more recipients.


