PERMISSIONS Full Access or Team Access privileges in Workplace Manager
NAVIGATION
 > Manage Storage link.
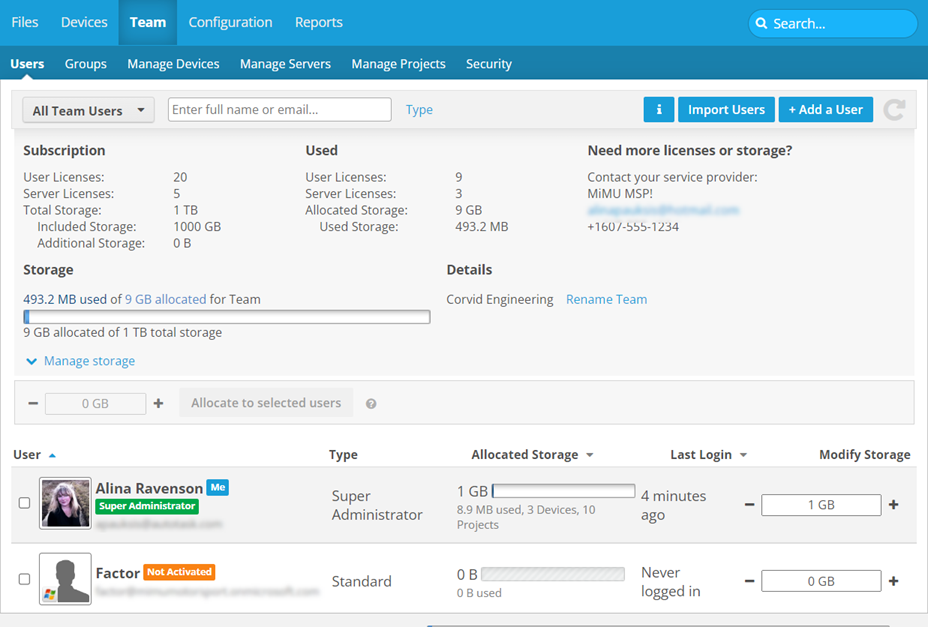
This page allows administrators to manage the storage available to users. It is only available to metered plan teams. There is no need to allocate storage for unlimited plans.
NOTE Since restricted users do not have storage available to them, they are not displayed on this page.
Each user has a sliding storage control associated with them. Their allocated storage space appears in black. The amount of space they're already using appears in gray.
You can divide your total team storage quota however you wish.
The total storage quota available to your team, as well as the amount already allocated, is tracked by the control at the bottom of the page.
About exceeding storage quota
Before a file begins to sync to the Workplace service, the system checks if the user has reached their storage quota limit. If they have not, the file will sync, even if syncing the entire file will put the user over their storage quota. They will not, however, be able to add any more files until either usage is reduced, or the user's quota is increased.
When 95% of a user's quota is used, an automated email is sent to user. When 95% of a user's quota is reached, an automated email is sent to the user and to all administrators for the user's team.
How to...
Click the up or down arrow next to a column heading to sort items in ascending or descending order.
NOTE The amount of storage the user is currently using appears in gray, under the Allocated Storage gauge.
- Enter the amount of storage you wish to allocate to the user.
TIP To make changes in 1 GB increments, use the +/- icons.
NOTE If you increase a user's storage quota, the change will appear in green, with a plus symbol (e.g. +2 MB). If you decrease their quota, the change will display in red, with minus symbol (e.g. -2 MB)
- Click Update.
- Select the check boxes corresponding to the users to whom you want to allocate the same amount of storage.
- Enter the amount of storage you want to allocate to all selected users in the field at the top of the list.
TIP To make changes in 1 GB increments, use the +/- icons.
- Click the Allocate to Selected Members button.
- Click Update.


