PERMISSIONS If public shares have been enabled, all project owners and standard users with Public Shares permissions. Restricted users cannot create public shares.
NAVIGATION Workplace Online > Files > Public Shares
Public shares allow anyone who has access to the Internet to view, download, and upload files stored on Workplace at no additional cost, making it possible to collaborate with users that do not have an account in your Workplace team.
While team shares makes full collaboration and file sharing possible, public shares allow you to share items stored in Workplace with a wider audience.
A public share can be created for any project, folder or file.
Depending on the specific settings you select when creating public shares, you can allow public recipients to:
- View, download, and/or upload files.
- Overwrite the files you share with them.
- Drop files for upload using an upload-only link.
- Edit shared Office files (.docx, .pptx, .xlsx), with Office 365.
PERMISSIONS To create a public share, you must either own the project or have Public Shares permissions for the item. Refer to Manage project, folder, and file team shares.
NOTE Editing with Microsoft Office requires a MS Office 365 commercial or business account.
NOTE Public shares can be disabled for specific users or groups of users with Policy Profiles. If you are a standard user and cannot create public shares, ask your administrator if public shares have been disabled.
How to...
- Locate the project, folder, or file to which you wish to create a public share.
- Click Public Shares. This will expand the Public Shares area:

- Toggle Allow public access to this file (or folder or project)on. This will enable public shares for this item, generate a publicly accessible URL and a QR code, and display your public share options and settings:
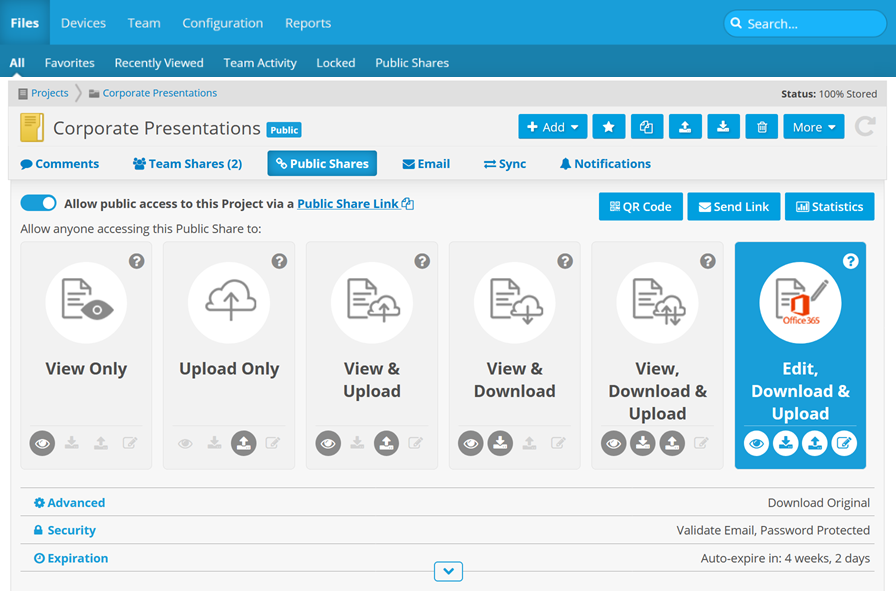
NOTE The public share is now created and accessible. Permissions default to "View & Download, but you can select any level of permissions you wish. You can proceed with the steps below to further define the share settings. Simply click on Public Share Link to copy it to your clipboard.
- Click the public share option you wish to apply. The following options are available:
| Options | Definition |
| Project and Folder Share Options | |

|
|
| View Only | Share recipients can only view the file via web browser. |
| Upload Only (projects and folders only) |
Share recipients can upload files via web browser. Existing files stored in that location will not be visible to them. This is the default selection for folder public shares. |
| View & Upload (projects and folders only) |
Share recipients can view or upload files via web browser. |
| View & Download | Share recipients can view or download files via web browser. |
| View, Download & Upload (projects and folders only) |
Share recipients can view, download, and upload files via web browser. They can also email files to this location. |
| Edit, Download & Upload |
Share recipients can view, download, and edit files with Microsoft Office 365, and upload files. They can also overwrite existing files. |
| File Public Share Options | |
|
|
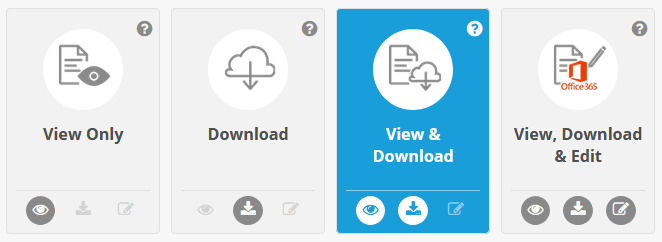
| View Only | Share recipients can only view the file via web browser. This is the default selection for project public shares. |
| Download |
Files will download automatically when the share recipients clicks the link. There will be no preview in the browser. |
| View & Download | Share recipients can view and/or download files via web browser. |
| View, Download & Edit |
Share recipients can view, download, and edit files with Microsoft Office 365, and upload files. They can also overwrite existing files. |
| Additional Settings |
|
|
Use the |
|
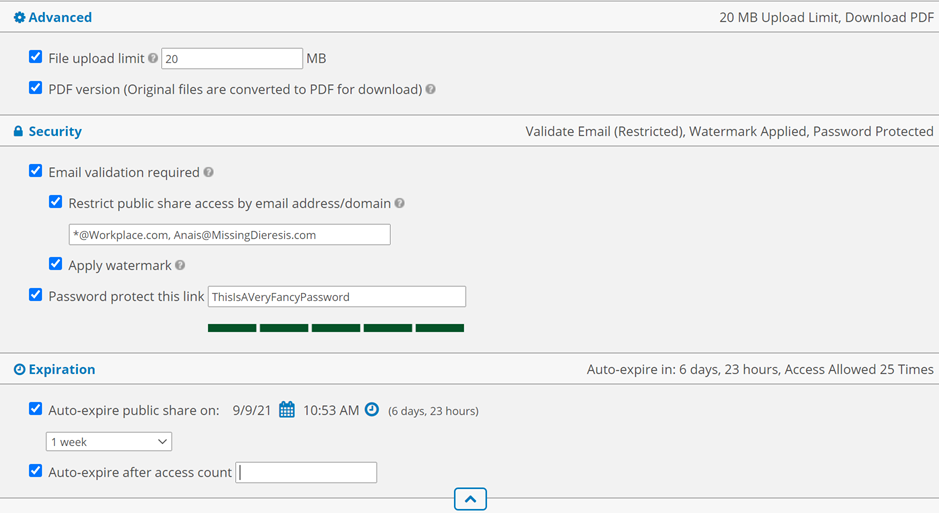
| Advanced | |
| Display without branding |
Directs share recipients to a Web portal interface without branding. |
| File upload limit (only available for project and folder shares when the share allows uploads) |
Allows you to limit the size of uploads to a folder or project. Enter a limit (in MB) or use the up/down buttons to adjust the limit. |
| PDF version (Original files are converted to PDF for download) (only available if the share allows downloads) |
Converts original files to PDF before they are downloaded whenever possible. |
| Security | |
| Emailing to a Public Share is disabled if security settings are enabled, as there is no ability to authenticate via email uploads. | |
| Email validation required | The public share recipient will be prompted to enter their name (optional) and email address (required) when they access the share. An email containing a link to the shared item is sent to the address they've entered. To access the publicly shared document, the recipient will click the link. |
| Restrict public share access by domain/email (only available when the email validation option is selected) |
Only recipients whose email addresses match the email addresses or domains defined here will be able to access the public share. Select the check box and enter the domains/email addresses to which you'd like to restrict initial access in the corresponding field. Separate entries with a comma. For domains, use the following syntax: *@domain.xxx |
| Apply watermark (only available when the email validation option is selected AND the share type is not Upload Only and Edit, Download & Upload) |
Stamps the email address of the user viewing the file on the PDF version of the document. NOTE Watermarks are only applied to files that are converted. Please refer to File conversion limits for more information. Files that cannot be converted or are viewed in their native application will not have a watermark applied. NOTE Watermarked files can only be downloaded one at a time via a public share. |
| Password protect this link |
Allows you to enter a password that the recipient must enter to access the share. TIP The strength meter will indicate how secure the password is. |
| Expiration | |
| Auto-expire public share* | Allows the duration for which the share is available to be set. Select the check box, then: Use the Select a predefined duration from the Select New Duration dropdown. |
| Auto-expire after access count* |
The share can be set to expire after a specified access count. Select the check box, then enter a value in the available field. NOTE Multiple accesses from the same public IP address within a 5 minute time frame will be considered as a single access. |
| *The share will expire upon an attempted access after the expiration criteria are met. For example, if a share is set to expire after being accessed 5 times, the 6th attempt to access the share will cause the share to become inactive. In this scenario, the external party trying to access the share will be denied access, however it may appear to a user viewing the public share settings that the share is still active until the 6th attempted access. | |
- Click the QR Code button. The QR Code popup opens.
- Click the Copy to Clipboard button to place the QR code on your clipboard.
- Click the Download QR Code button to download the QR code image.
- Click the Send Link button. The Send Link popup opens, allowing you to email the file to one or more recipients:
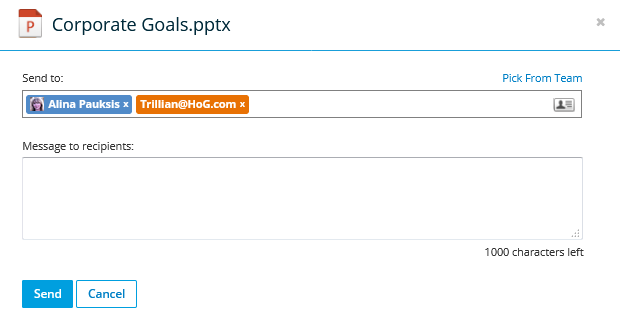
- Begin typing a name or email address or click the Pick From Team link or the
 icon to find a user's email address. You may also enter external email addresses. User email addresses will display in blue, while other email addresses will display in orange.
 - Optionally, add a message, then click Send.
- Click the Statistics button. This will open the Public Access Statistics popup:
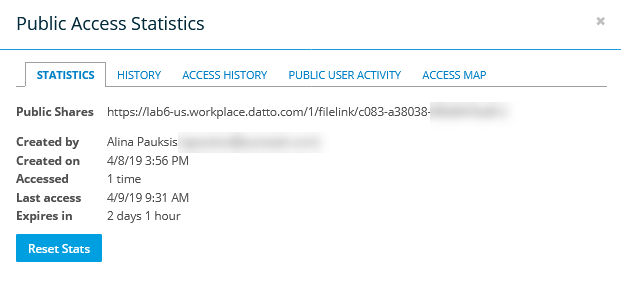
- The popup displays statistics, history, access history, public user activity, and an access map. Click a tab title to change the statistics view.
- Click the Reset Statistics button to reset the data on the Statistics tab only.
- Click Public Share Link to copy it to your clipboard.
- Paste the share link wherever you like.
- On your desktop or laptop, navigate to the Workplace project, folder or file to be made publicly available.
- Right-click on the project, folder or file and select Create Public Link.
- Select the Allow public access to this project/folder/file check box.
- Set your public share preferences.
| Setting | Definition |
|---|---|
| Standard Link | Directs users to a simplified version of this same page with your custom branding. |
| Direct Link | Allows file downloads with minimal user interaction. Note that downloading files cannot be restricted when using a direct link. |
| Download Enabled (Standard link only) |
Specifies whether the user can download the file(s) that are publicly linked. Select he radio button to specify whether the user can download the original file or only a .pdf version of it. NOTE If the file cannot be converted to a .pdf (e.g. a video file) the user will not be able to view the file. |
| Password protect this link | Requires a password to access the link. You can then enter a password manually, or click the generate password link for a system-generate password. |
| Auto-expire public link* |
Allows the duration for which the link is available to be set. Select the check box, then: Use the date and time dropdowns to select a precise expiration date and time, or Select a predefined duration from the Select New Duration dropdown. |
| Auto-expire after access count* |
The link can be set to expire after a specified access count. Select the check box, then enter a value in the available field. Multiple accesses from the same public IP address within a 5 minute time frame will be considered as a single access. |
| *The link will expire upon an attempted access after the expiration criteria are met. For example, if a link is set to expire after being accessed 5 times, the 6th attempt to access the link will cause the link to become inactive. In this scenario, the external party trying to access the link will be denied access, however it may appear to a user viewing the public link settings that the link is still active until the 6th attempted access. | |
- Click Create Link. The URL will be copied to your clipboard when you click.


