June 2016
Workplace Desktop 5.2 for Windows introduces the following improvements:
- Silent/remote Installation
- Merge feature for syncing projects via the Folder Sync tab
- Run Workplace Desktop simultaneously in multiple Windows user accounts
- Improved uninstall process
- “Run as Service” improvements
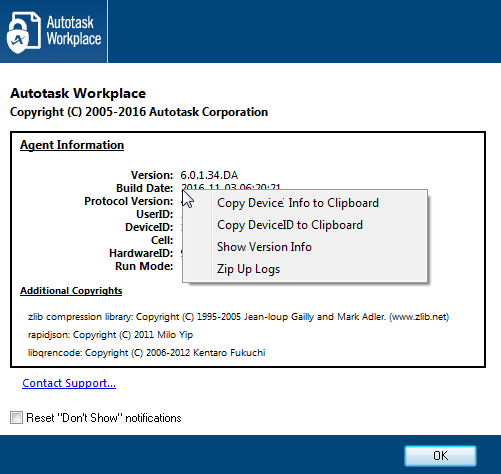
- Support shortcuts in the About window
Known Issue Resolutions
The following known issues were fixed Workplace Desktop 5.2 for Windows:
- A bug in the 5.1.0.80 version of Workplace Desktop resulted in the availability of the Workplace Desktop folder sync to all users. As a result of the resolution of this issue, you will no longer see the Folder Sync tab if you are not an administrator or super administrator.
- Resolved issue in which changes to the “Use fastest speed” timeframe settings on Preferences... > Preferences button > Network were not saved.
- Corrected syncing issues caused by files with a space at the beginning or end of the file name.
- In previous iterations of Workplace Desktop, loss of web connectivity would result in a restart of the file sync process when connectivity was reestablished. With this release, when connectivity is reestablished, a file will continue the sync process where it left off rather than restarting the sync. This primarily affects Workplace Desktop installations on unstable connections, satellite connections, or those syncing very large files from a laptop (where it is likely the machine will be moved while still syncing).
Requirements
Workplace Desktop 5.2 for Windows requires:
- Windows 7 Service Pack 1 or later
or
Windows Server 2008 R2 Service Pack 1 or later - NET Framework 4.7.2 or later (The EXE installer will automatically install the appropriate .NET framework, however the MSI package for AD GPSI requires the .NET framework to be installed independently)
Workplace Desktop 5.2 for Windows introduces the ability to silently install Workplace Desktop on a user’s machine via an Endpoint Management tool such as Datto RMM, Active Directory Group Policy Software Installations (AD GPSI), Microsoft Intune, Microsoft System Center or similar.
NOTE Silent installations will only work from new installations or upgrading a device already running Workplace Desktop 5.2 or later.
NOTE With Workplace Desktop 5.2 for Windows, the installation changes from per-user to per-machine.
You must be logged in to Workplace to download the required MSI file. To download, go to the Devices tab or the Dashboard tab, click the Install Workplace button, then click the Download Workplace Desktop for AD GPO installations link.
Once Workplace Desktop is remotely installed, the user simply launches Workplace Desktop from their Program Files folder, enters their credentials, and completes the configuration.
Installer Commands
The following commands are supported by the Workplace Desktop EXE installation package. The commands must be preceded by the Workplace Desktop installer name, for instance “AutotaskWorkplace_v6.0.0.exe”.
| Command | Result |
|---|---|
| /? | Displays a list of all possible commands. |
| /install | Checks system prerequisites, installs required components (for instance, .NET Framework and Visual C++ Runtime library), and Workplace Desktop. |
| /uninstall | Removes Workplace Desktop, its binaries, and unregisters Windows components (shell extensions, Microsoft Office Add-in and others). It will not uninstall prerequisite components which include .NET Framework, Visual C++ Runtime or other similar components. When used in combination with /quiet or /passive, the configuration and data are retained. |
| /quiet | Nothing is displayed to the user. |
| /passive | Shows minimal UI with no ability to interact, but progress is displayed. |
| /norestart | Suppresses any attempt to restart the computer. |
| /log <PATH><FILENAME>.txt | Allows you to specify the path and filename to which installation logs are saved. By default, the path is %TEMP% and the filename is “Autotask Workplace Setup_<number>.log”. |
Errors are reported by means of an exit code and detailed information can be found in the log file. Successful installation returns exit code 0.
Installing via AEM
Autotask Endpoint Management (AEM) can be used to deploy Workplace Desktop to your Windows devices in silent mode by running the “Autotask Workplace Desktop [WIN]” component via a quick job, a scheduled job or a monitor. For further information on how to download the component from the AEM ComStore and how to run it, refer to these topics in the AEM Help:
Installing via AD GPSI
Further information about deploying via AD GPSI can be found here. You must be logged in to Workplace to download the required MSI file. To download, go to the Devices tab or the Dashboard tab, click the Install Workplace button, then click the Download Workplace Desktop for AD GPO installations link.
The Folder Sync tab is only available to team administrators.
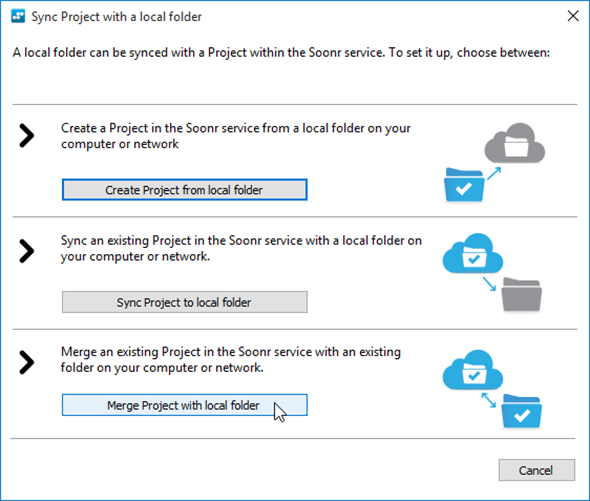
The Folder Sync tab has always allowed users to sync a local folder to a project or a project to a local folder. Workplace Desktop 5.2, we have introduced the ability to merge a local folder with a project.
This option can be particularly useful should the local folder become disconnected from the project as this will allow them to be reconnected much more quickly than before. For instance, you need to replace a machine that is hosting a Workplace Desktop instance syncing to a network volume, this merge option can be used to get Workplace Desktop on the replacement machine back into full operation very quickly.
To merge a project with a local folder:
- On the Folder Sync tab, click Sync Project…
- Select the Merge Project with local folder option:
- Click Select Project and select the project already in the Workplace service to merge:

-
Click Browse… and navigate to the local folder to merge.
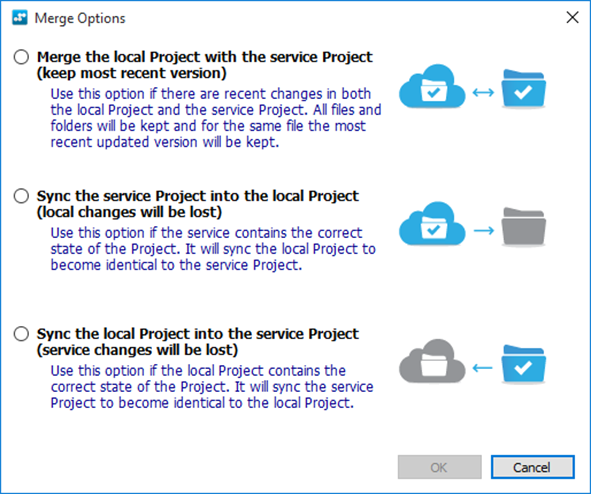
- Merge the local Project with the service Project
Files will be merged. If files in the same location have the same name, the most recent version will be retained. If the older version exists on Workplace Desktop, it will be deleted. If the older version exists in the service, it will be available under “Previous Versions”. - Sync the service Project into the local Project
Any local files that do not exist in the service project will be removed. - Sync the local Project into the service Project
Any files in the service that do not exist in the local project will be removed.
- Click Merge Projects.
- Click OK.
Workplace Desktop will scan all the files in the local folder, compare them to those on the server, and connect all files that match precisely.
Once all the matching files are connected, a notification will display to confirm that the connection of files is complete and that the remaining files will sync as normal:
Workplace Desktop 5.2 for Windows supports running on multiple user accounts, even when running in service mode.
This is useful in scenarios in which multiple Workplace accounts must be synced with a file server, typically a multi-tenant setup hosted on a single file server. Previously, this would have required a separate machine (virtual or real) to host each instance of the Workplace Desktop. With Workplace Desktop 5.2 for Windows, a different Windows user account can be used for each instance, and each instance can be run in service mode. This means that each instance will automatically start after a reboot or Workplace Desktop is updated.
To use this feature, simply:
- Launch and configure Workplace Desktop within each Windows user account.
- Select the Run as Service option from the Workplace menu in the system tray.
Uninstalling When Running Multiple Instances of Workplace Desktop
When uninstalling the conventional way, Workplace Desktop and all files associated with the user performing the uninstall are removed from the machine.
In a scenario in which multiple instances of Workplace Desktop are running under different user accounts on one machine, the process below can be used to only remove the files associated with the user performing this process - Workplace Desktop will remain installed, allowing the other user accounts to continue to use Workplace as they normally would.
To remove the Workplace account from a single Windows user account:
- Open the Run command dialog
- Enter awp:reset
- Click OK
The standard uninstall dialog will appear, as detailed in the Improved Uninstall Process section of this document. Just select No in the first dialog box to remove all the supporting files related to Workplace Desktop under this Windows user profile.
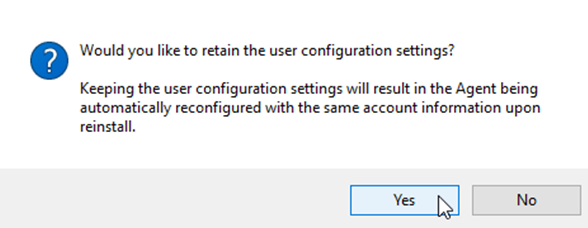
The uninstall process now consists of two steps.
The first step allows you to select whether to retain the user’s configuration settings:
Selecting Yes will cause Workplace Desktop to automatically reconnect with the same user credentials when Workplace Desktop is reinstalled. All data synced to the device will remain stored on the device.
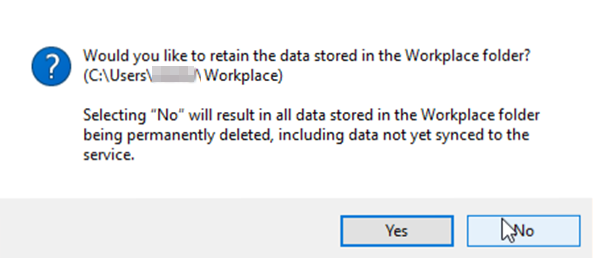
If you select No in the first step, an additional step is shown, which allows you to decide whether to retain the data stored on the device:
Here, selecting Yes will keep the Workplace folder intact with all the synced data.
Selecting No will result in all synced data being immediately and permanently deleted from the device.
NOTE Folders synced via the Folder Sync tab will never be removed when Workplace Desktop is uninstalled. If files exist on the machine running Workplace Desktop that have not been synced to the Workplace service, you will be alerted and requested to confirm removal the local files.
For general information concerning installation or uninstallation, please refer to Install or uninstall the Workplace appInstall or uninstall the Workplace app
The Run As Service feature now has the option to run as LocalSystem (the default on previous versions of Workplace Desktop) or as the Windows user under which Workplace Desktop is running.
The LocalSystem will enable Workplace Desktop to run as a background process even when the user is not logged in. It may not, however, have sufficient permissions to the data set to sync; the LocalSystem account requires full permissions to the data set in order for syncing to function.
The Windows User account will more likely have the necessary permissions to data set, but must be part of the Admin group and listed in the “Log on as a service” policy in the Local Security Policy:
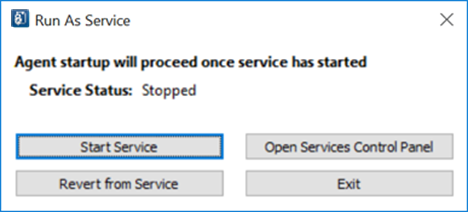
Should the Workplace service stop for any reason, the following prompt will be displayed upon restart of Workplace Desktop:
This dialog box offers the options to:
- Start Service
This option restarts the service. - Revert from Service
This option reverts from service mode to “Unified Mode” (the standard mode). - Open Services Control Panel
This option opens the Windows Services Control Panel. - Exit
This option closes the dialog box without any action being taken.
Right-click on Device Information in the About window to access the following options:
- Copy Device Info to Clipboard
Copies the User ID, Device ID and Workplace Desktop version to clipboard. - Copy Device ID to Clipboard
Copies the Device ID to clipboard. - Show Version Info
Displays the versions for all plugins. - Copy logs to Desktop
This creates a .zip file with the logs from Workplace Desktop and places the .zip file on the desktop.
