PERMISSIONS All Workplace for Windows and Mac users
NAVIGATION Taskbar/menu bar > ![]()
VIDEO Click here for a brief introductory video.
Workplace for Windows and Mac (v10) allows you to access the entire data repository on demand and to access all your most frequently used features directly from context menus.
The Workplace app is installed on your computer and runs silently in the background. It ensures that the latest versions of your files and the files shared with you are available to you locally.
The Workplace app is also responsible for making backups of folders you have selected, if that feature is available to you. For more information on that, please refer to our Workplace app Backups tab topic.
Projects that you store locally on your desktop or laptop are managed through The Workplace app interface or The Workplace Folder interface. The latter is where the local versions of projects synced to Workplace are stored.
The Workplace app will watch for changes to your locally stored projects as well as projects changed via Workplace Online and sync them, so your team is always working on the most recent versions of files.
This topic explains how to use the Workplace for Windows and Mac app interface. We'll also walk you through some other basic functions.
For highly detailed instructions for common functions and specific screens, please use the left navigation menu or refer to:
- Workplace app Network tab
- Workplace app Backups tab
- Workplace app Network tab
- Locate your device ID and user ID
- Find Your Workplace app log files
- Pause or resume the Workplace app
- Start or shut down the Workplace app
Features
Workplace v10 features "cloud drive," which transforms your cloud repository into a virtual local library, so you can...
- Enjoy full access to all of your Workplace files right on your PC.
- Make your files available offline by syncing them from the new file or folder right-click menu in The Workplace app interface or in The Workplace Folder interface.
- Use these context menus to quickly and easily perform common functions like sharing with your team, creating and managing public shares, file locking, and marking items as favorites.
You can now control the drive letter for your Workplace Folder. This provides a more familiar experience if you're accustomed to using mapped drives to network shares or external drives. It's also a more elegant solution if you use absolute links to documents.
We've reworded our Disable Workplace Upgrade Notifications policy, which is now called Restrict Update Automation. That's because our new app supports automatic update with no user intervention required.
This policy will:
- disable upgrade notifications on v8 and earlier.
- prevent auto-update of the new Workplace app (if you prefer to manually update using Datto RMM or something similar).
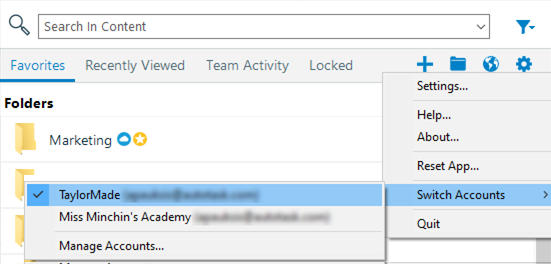
If you have multiple Workplace accounts, you can associate them all with one instance of Workplace for Windows and Mac. This allows you to seamlessly switch between accounts. You can also remove accounts. For more information, please refer to Switch between Workplace accounts.
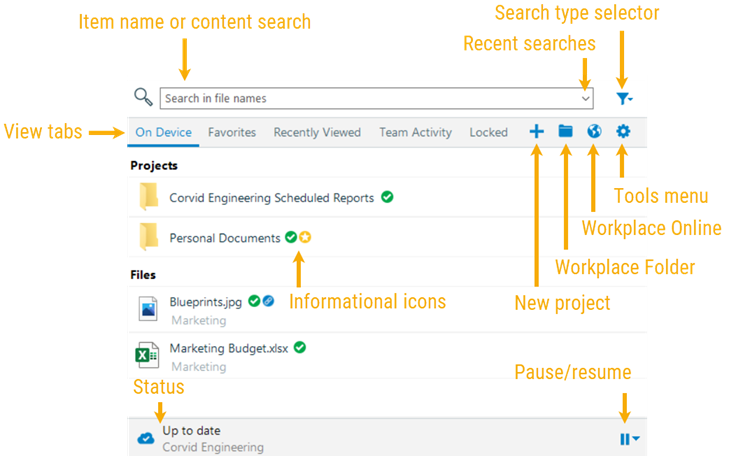
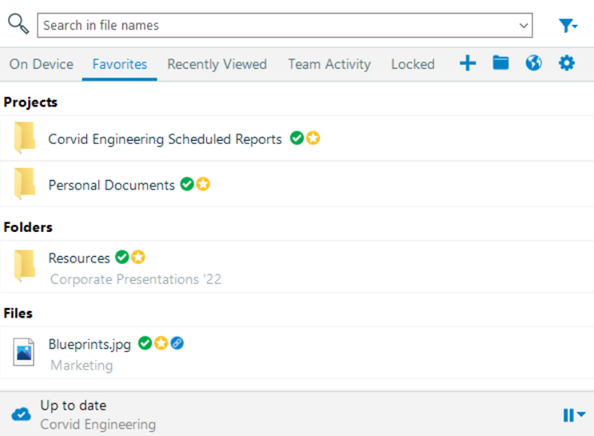
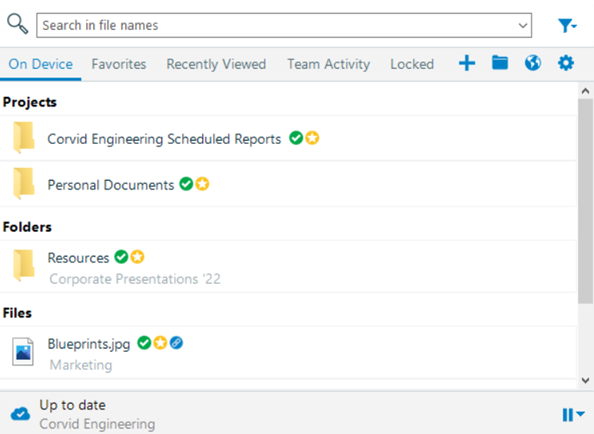
An intuitive user interface makes is easy to locate what you and your team have worked on recently in the Workplace app. Favorites and locked files each have their own display tab as well. The search feature allow you to find your items by name or by name and file content.
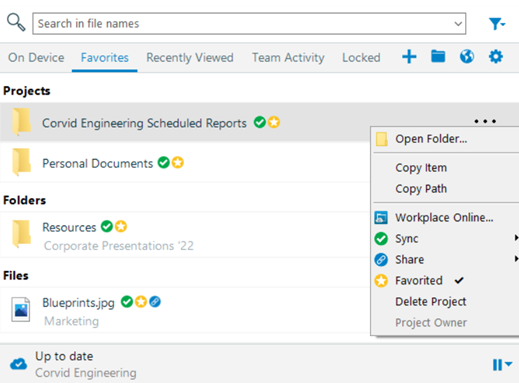
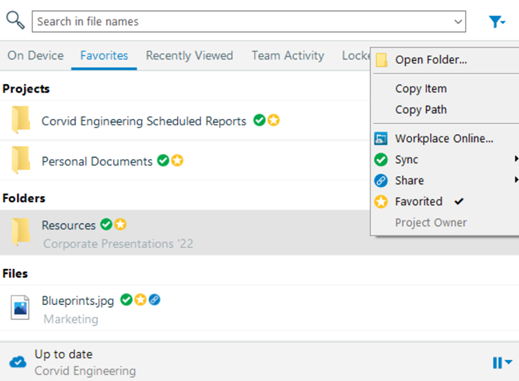
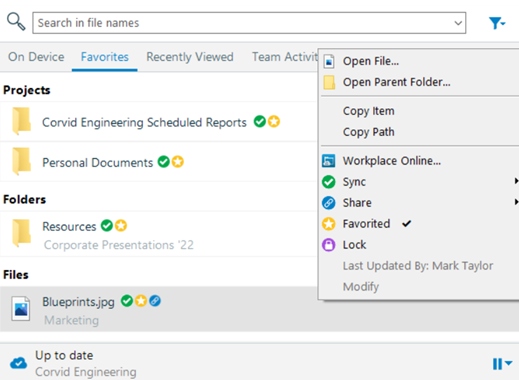
Context menus in the app interface make your options clear and easily accessible. To access these menus in tthe app interface, just right-click an item. You can also access the context menu in the main interface using the  element that appears on the right side of any line item.
| App interface |
|---|
| Project context menu |
|
Folder context menu |
|
File context menu |
|
|
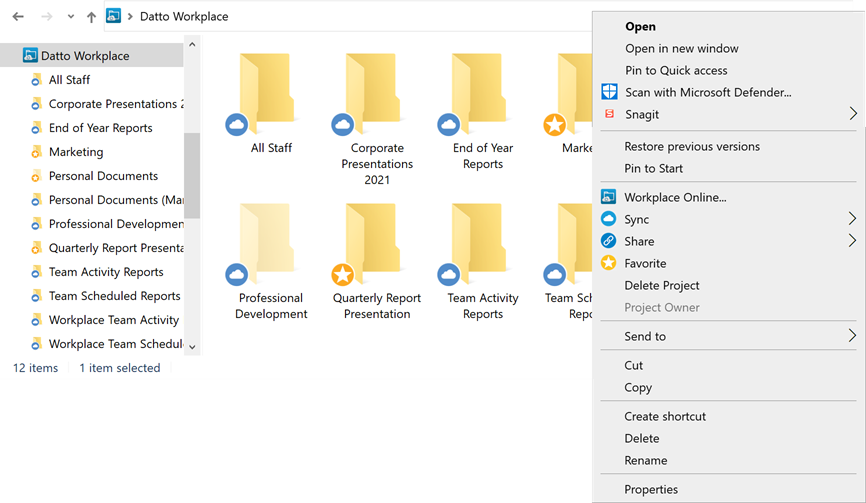
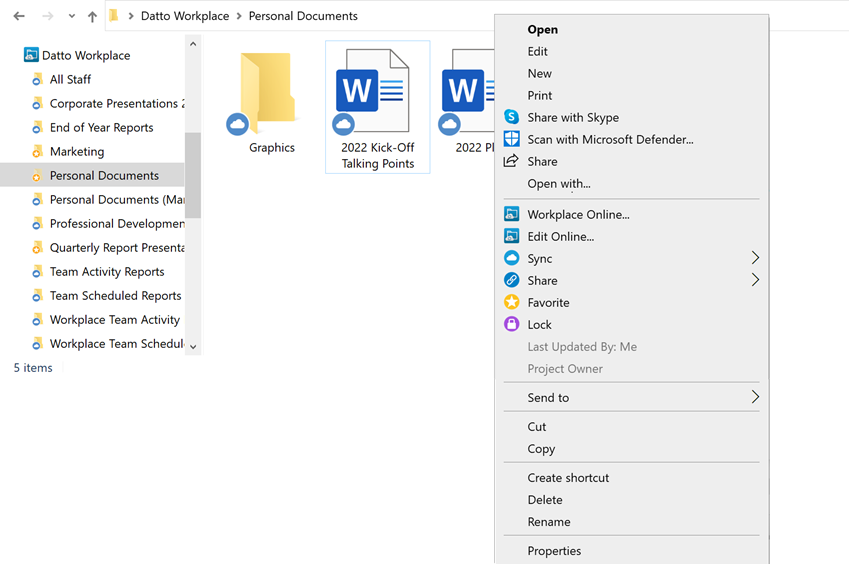
Just as they do in the Workplace app interface, context menus in your Workplace Folder make your options clear and easily accessible. To access these menus in the Workplace Folder, just right-click the item.
| Folder Context Menu | File Context Menu |
|---|---|
| Workplace Folder | |
|
|
The icons associated with each item in the Workplace Folder allow you to instantly see what state they're in. And whether you're in the main interface or in the Workplace Folder, our icons always mean the same thing:
| Icon | Meaning |
|---|---|
|
|
The item is available to you when you're online. |
|
|
The item has been synced and is available to you offline. |
|
|
The item has been locked. |
|
|
The item has been locked by another user. |
|
|
The item is one of your favorites. |
|
|
The item has been publicly shared. |
How to...
Workplace for Windows and Mac (v10) is the default installation app for the Workplace service. For detailed instructions on installation, please refer to Install or uninstall the Workplace app.
If you're and administrator interested in deploying Workplace for Windows and Mac to your users remotely, please refer to Silent installation.
NOTE You can search either by item name or by name and file content. To change your search type, click the  icon to the right of the search field, hover over Search In, and select your preference for search type. You may enter your search term(s) before or after you make your search type selection.
- In your taskbar/menu bar, click the
 icon.
icon. - In the Search field, begin typing your query.
- Your search results will display below the search field and will be refined further as you type.
- In the results area, double-click a file to open it on your device, or double-click a folder to open it in your Workplace Folder. You may also right-click an item to reveal additional options.
-
Execute a search.
-
Click the small pushpin icon in the upper right corner of the search results area.
-
To unpin your search results, click the pushpin icon again.
NOTE once your search results are pinned, you can close the app window by clicking the Workplace icon in your taskbar. Workplace remembers your pinned search selection, so the next time you execute a search, the app will use the last state (pinned or unpinned) that you set.
- In your taskbar/menu bar, click the
 icon.
icon. - Click one of the item view links. Your options are Favorites, Recently Viewed, Team Activity, and Locked.
- Double-click a file to open it on your device, or double-click a folder to open it in your Workplace Folder.
- In your taskbar/menu bar, click the
 icon.
icon. - Click the
 button at the bottom of the window to simply pause until tomorrow, or select a duration. The Workplace service will resume automatically at the end of that period.
 - To manually resume the service, click the
 button.
- In your taskbar/menu bar, click the
 icon.
icon. - Click the
 icon in the top right portion of the view.
NOTE You must be online to sync items for offline use.
- Open your Workplace Folder or click the
 icon in your taskbar/menu bar.
 - Locate the file or folder you wish to make available offline.
- Right-click the file(s) or folder(s), or click the
 element on the right side of the item line.
 - Go to Sync on the menu, then select Available Offline from the submenu. The icon associated with the file will change to
 when the sync is complete.
PERMISSIONS You must have the correct permissions in order to share items. For more guidance on sharing safely, please refer to Manage project, folder, and file team shares.
NOTE You must be online to share items.
- Open your Workplace folder or dashboard.
- Navigate to the project, folder, or file for which you want to create a public share.
- Right-click the item.
- Select Share, then select a share option from the secondary menu.
If you select Edit Team Share, please refer to Share a project or folder for your next steps.
If you select Create Public Share, the interface below will display: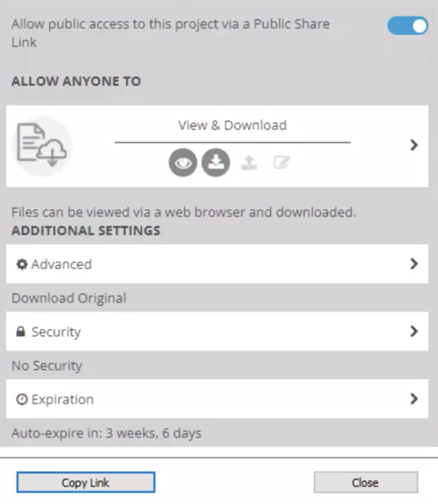
- Toggle the Allow Public access to this project via a Public Share Link switch on.
NOTE Use the arrows buttons to expand or collapse the panels. When a panel is collapsed, a summary of the settings is displayed below each section header.
- Click the public share option you wish to apply, then configure any additional share options you wish to apply. The following options are available:
| Option | Definition |
| Project and Folder Share General Options | |
| View Only | Share recipients can only view the file via web browser. |
| Upload Only (projects and folders only) |
Share recipients can upload files via web browser. Existing files stored in that location will not be visible to them. This is the default selection for folder public shares. |
| View & Upload (projects and folders only) |
Share recipients can view or upload files via web browser. |
| View & Download | Share recipients can view or download files via web browser. |
| View, Download & Upload (projects and folders only) |
Share recipients can view, download, and upload files via web browser. They can also email files to this location. |
| Edit, Download & Upload |
Share recipients can view, download, and edit files with Microsoft Office 365, and upload files. They can also overwrite existing files. |
| File Public Share General Options | |
| View Only | Share recipients can only view the file via web browser. This is the default selection for project public shares. |
| Download |
Files will download automatically when the share recipients clicks the link. There will be no preview in the browser. |
| View & Download | Share recipients can view and/or download files via web browser. |
| View, Download & Edit |
Share recipients can view, download, and edit files with Microsoft Office 365, and upload files. They can also overwrite existing files. |
| Advanced | |
| Display without branding |
Directs share recipients to a Web portal interface without branding. |
| File upload limit (only available for project and folder shares when the share allows uploads) |
Allows you to limit the size of uploads to a folder or project. Enter a limit (in MB) or use the up/down buttons to adjust the limit. |
| PDF version (Original files are converted to PDF for download) (only available if the share allows downloads) |
Converts original files to PDF before they are downloaded whenever possible. |
| Security | |
| Emailing to a Public Share is disabled if security settings are enabled, as there is no ability to authenticate via email uploads. | |
| Email validation required | The public share recipient will be prompted to enter their name (optional) and email address (required) when they access the share. An email containing a link to the shared item is sent to the address they've entered. To access the publicly shared document, the recipient will click the link. |
| Restrict public share access by domain/email (only available when the email validation option is selected) |
Only recipients whose email addresses match the email addresses or domains defined here will be able to access the public share. Select the check box and enter the domains/email addresses to which you'd like to restrict initial access in the corresponding field. Separate entries with a comma. For domains, use the following syntax: *@domain.xxx |
| Apply watermark (only available when the email validation option is selected AND the share type is not Upload Only and Edit, Download & Upload) |
Stamps the email address of the user viewing the file on the PDF version of the document. NOTE Watermarks are only applied to files that are converted. Please refer to File conversion limits for more information. Files that cannot be converted or are viewed in their native application will not have a watermark applied. NOTE Watermarked files can only be downloaded one at a time via a public share. |
| Password protect this link |
Allows you to enter a password that the recipient must enter to access the share. TIP The strength meter will indicate how secure the password is. |
| Expiration | |
| Auto-expire public share* | Allows the duration for which the share is available to be set. Select the check box, then: Use the calendar and clock icons to select a precise expiration date and time, or select a predefined duration from the Select New Duration dropdown. |
| Auto-expire after access count* |
The share can be set to expire after a specified access count. Select the check box, then enter a value in the available field. NOTE Multiple accesses from the same public IP address within a 5 minute time frame will be considered as a single access. |
| *The share will expire upon an attempted access after the expiration criteria are met. For example, if a share is set to expire after being accessed 5 times, the 6th attempt to access the share will cause the share to become inactive. In this scenario, the external party trying to access the share will be denied access, however it may appear to a user viewing the public share settings that the share is still active until the 6th attempted access. | |
- Click the Copy Link button to copy the public share link to your clipboard. Click the Close button to close the window.
NOTE Once you have created a public share for an item, the Edit Public Share... option will become available for that item.
- Open your Workplace Folder or click the
 icon in your taskbar/menu bar.
 - Locate the shared file or folder.
- Right-click the item or click the
 element on the right side of the item line.
 - Go to Share on the menu, then select Copy Public Link or Copy Team Share Link. The link will be copied to your clipboard.
NOTE You must be online to lock or unlock items.
- Open your Workplace Folder or click the
 icon in your taskbar/menu bar.
 - Locate the file you wish to lock or unlock.
- Right-click the file, or click the
 element on the right side of the item line.
 - Select Lock to lock the file or Locked
 to unlock a locked file.
NOTE If you are performing this function in your Workplace Folder and have selected multiple items, your options will be Lock and Unlock. Your selection will be applied to all selected files.
NOTE You must be online to favorite or unfavorite items.
- Open your Workplace Folder or click the
 icon in your taskbar/menu bar.
 - Locate the file or folder you wish to favorite or unfavorite.
- Right-click the item, or click the
 element on the right side of the item line.
 - Select Favorite to favorite the item(s) or Favorite
 to unfavorite the item(s).
NOTE If you are performing this function in your Workplace Folder and have selected multiple items, your options will be Favorite and Unfavorite. Your selection will be applied to all selected files.
- Click the
 icon in your taskbar/menu bar.
 - Click Recently Viewed.
- Right-click the item you wish to remove and select Remove from Recent.
- In your taskbar/menu bar, click the
 icon.
icon. - Click the
 icon and select Add Account... This will open either your Active Directory login or a Workplace setup wizard.
 - When prompted, enter the email address and password associated with the account you want to add. Click either Next or Continue to move the process forward.
- If the account you're adding has no linked accounts, you've completed the process and the Manage Accounts window will display. If the account you're adding has linked accounts, you'll see the window below:
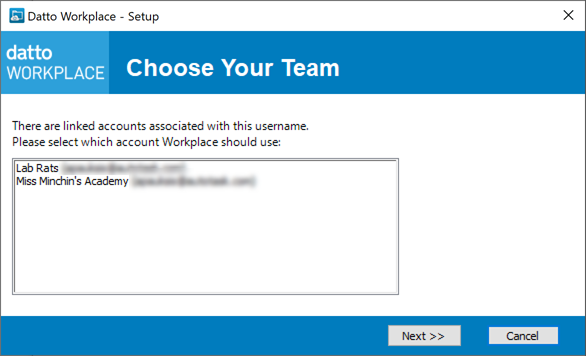
- Select the account you'd like to add.
- Click Next. If the account you've selected has a different password from the one you entered in step 4, this will open the window below:
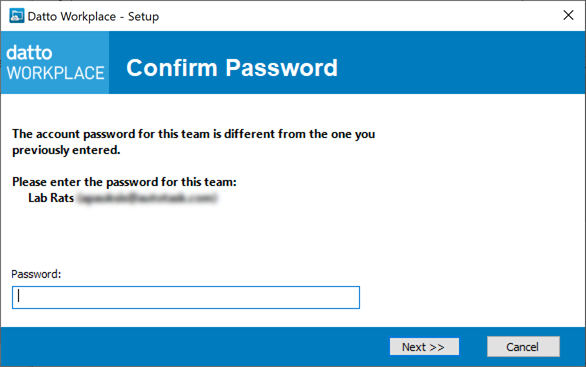
- Enter the password associated with the account you selected.
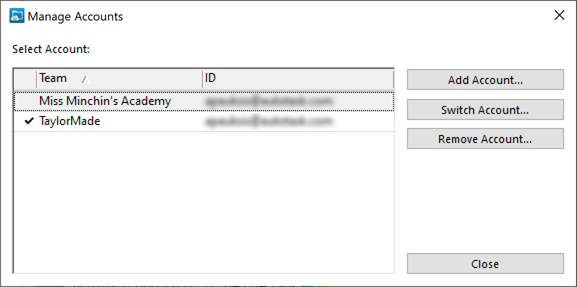
- Click Next. The process is complete and the Manage Accounts window will display:
- In your taskbar/menu bar, click the
 icon.
icon. - Click the
 icon and place your cursor over Switch Accounts.... Select Manage Accounts... from the secondary menu. This will open the Manage Accounts window:
- Click the account you wish to remove to highlight it.
- Click Remove Account....
IMPORTANT There is no confirmation popup for this function. Once you click Remove Account..., the account is removed from this instance of Workplace for Windows and Mac. You can, however, add it again.
PERMISSIONS You will not be able to perform this function if the Select Policies policy is enabled.
Datto Workplace's Smart Caching stores files when opening them without syncing them first. Often, due to this mechanism, files you worked on recently will be available offline even if you have not synced them. The larger the cache size, the more likely the file will be available when offline.
- In your taskbar/menu bar, click the
 icon.
icon. - Click the
 icon and select Settings... from the menu. The Settings window will open to the Workplace tab:
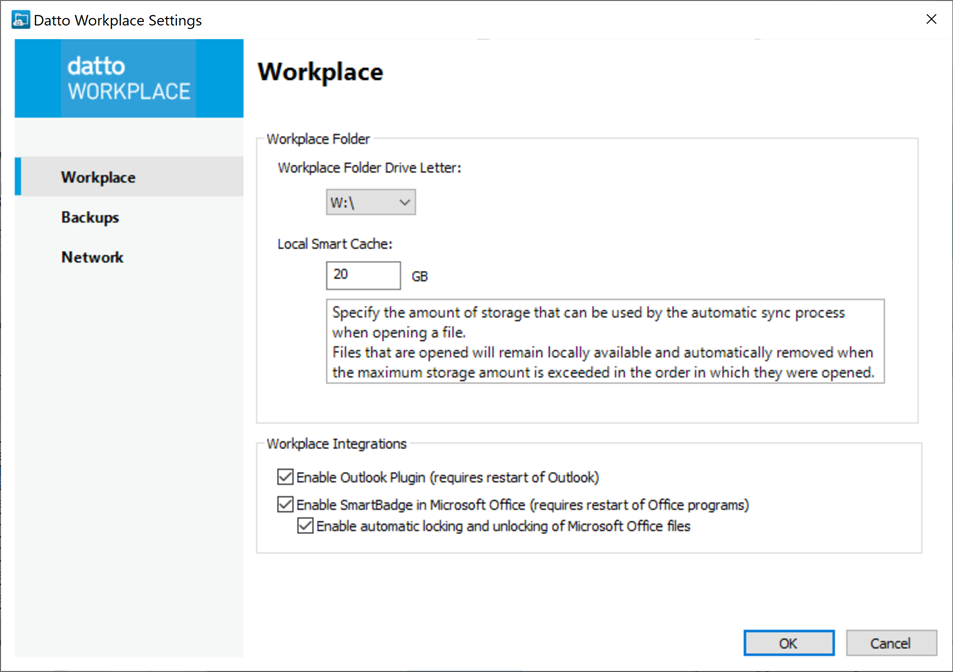
- Adjust the entry in the Local Smart Cache field.
- Click OK.
NOTE For detailed instructions on this and related processes, please refer to Workplace app Workplace tab.
PERMISSIONS You will not be able to perform this function if the Select Policiespolicy is enabled.
- In your taskbar/menu bar, click the
 icon.
icon. - Click the
 icon and select Settings... from the menu. The Settings window will open to the Workplace tab:
- Make a new selection in the Workplace Folder Drive Letter field.
- Click OK.
NOTE For detailed instructions on this and related processes, please refer to Workplace app Workplace tab.
