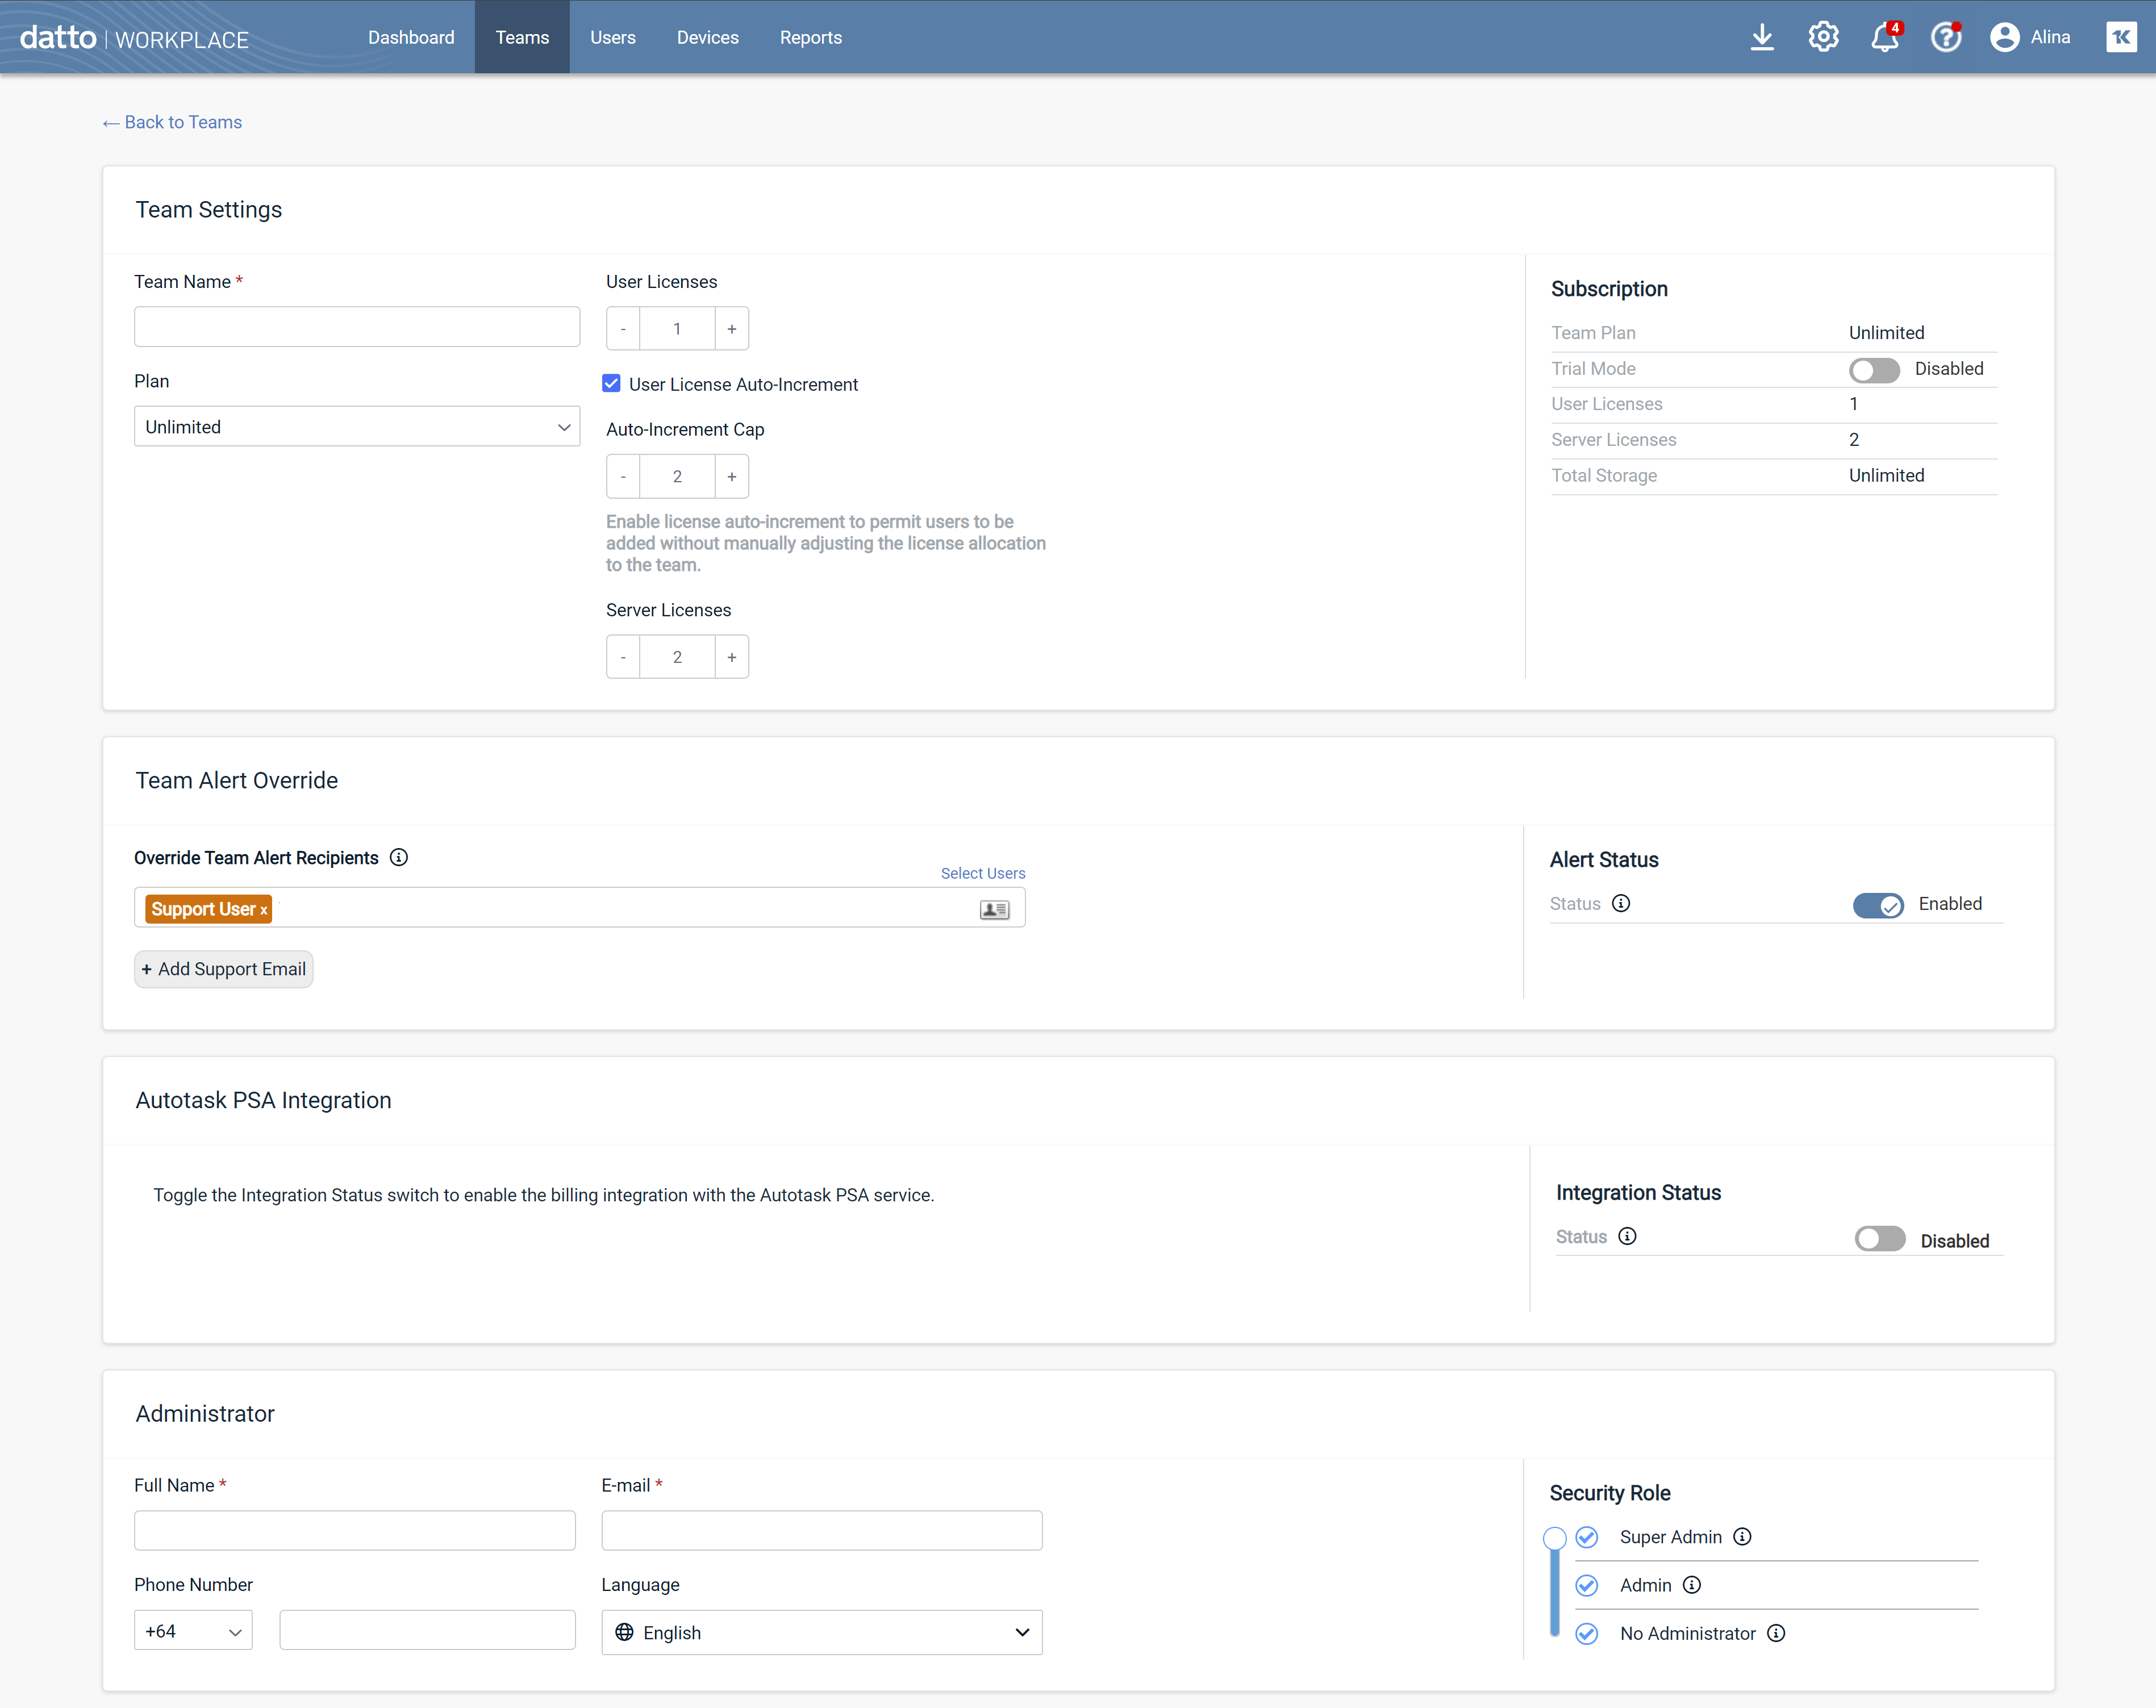
If you have Full Access or Team Access privileges in Workplace Manager, just follow these steps...
BEFORE YOU BEGIN Before you create any teams, please configure your support details so your clients know how to get support. Refer to Set up your support information.
TIP To make team creation faster and more consistent, remember to set up your Set Team Defaults. This will enable you to skip a lot of data entry and equip new teams with a default policy profile automatically.
- Log in to Workplace Manager.
- Click Teams in the top navigation bar.
- Click the +Create Team button. The Create New Team page will be displayed. Depending on whether you sell unlimited or metered plans, the interface will be slightly different. For details, please refer to Metered vs. unlimited plans .

- Complete the fields and selections as follows:
| Field | Description |
|---|---|
|
Team Settings |
|
| Team Name | Enter the team or company name you will use in Workplace. If you are integrating with Autotask, best practice is to use the same name you are using or are going to use in Autotask. |
| Plan |
Select the plan type for the team. Metered plans come with a set amount of storage, but you can add more storage. Unlimited plans have no storage limit. Depending on your selection in this field, additional fields may display. |
| User Licenses | The number of users who can access Workplace. For metered plans, each standard user will add 50 GB of storage to the team pool. |
| Server Licenses | The number of instances of Workplace Server. |
| Included Storage |
For metered plans, this calculated field displays the total amount of storage available with the selections made above. For unlimited plans, this read-only field displays Unlimited. |
| Additional Storage (metered plans only) |
The additional storage purchased by the customer, which is added to the storage pool. Additional storage is purchased in 100 GB increments. Storage can be allocated freely by the team administrator. |
| Invoice Frequency | Determines the billing interval for this customer. Options are Monthly and Yearly. |
| Trial Mode | If you want to give the new team a free 30-day trial, toggle this switch to Enabled. When a team's trial period expires, their status will automatically change to "Deleted in X days," and will count down from 90. This selection is not available when editing a team. To switch a trial mode team into a billed team, refer to How do I create a new team?. |
|
Team Alert Override |
|
| Team Alert Recipients |
If this feature is enabled, recipients designated here will override those on the Notifications page. Alert recipients specified in this field will receive team alert notifications for this team only. To add alert recipients do one or more of the following:
NOTE If Workplace Manager identifies an email address as a Workplace Manager user, it will appear in blue. All other email addresses, including the support email address, will appear in orange. |
|
Autotask Integration This section does not display for your Internal User License team. |
|
| Map team to Autotask company | If you would like to map this team to Autotask, you must first Configure the integration in Workplace Manager. To map this team to Autotask, toggle this switch to Enabled. Two new radio buttons will appear. To disable this feature, toggle this switch to Disabled. |
| Map the team to an existing Autotask company | If you select this option, you have an opportunity to search existing companies in your Autotask database for an exact match. Click Find Autotask company. • If one or more exact matches are found, they will be displayed on the popup. Use the radio button to select one. • If an exact match is not found, you can change the values in the Search field (for example, if you know the company has a different name in Autotask), and map the team to a match. For details, refer to Map a Workplace team to Autotask. |
| Create new Autotask company for this team | If you select this option, a new Autotask company will be created using the Team/Company Name you entered above. For details, refer to Map a Workplace team to Autotask. |
|
ConnectWise Integration |
|
| Map Team to ConnectWise company |
If you would like to map this team to ConnectWise, you must first Integrate with ConnectWise |
|
Administrator |
|
| Full Name | Enter the first and last name of the new user. This field cannot be empty, so you must enter at least one or the other. |
| Enter the email address for the customer team administrator. | |
| Phone Number | Enter a phone number. If you enter a phone number, you must first select a country from the prefix dropdown. |
| Language | Select a default language for this user's interface. |
|
Security Role |
In this area, you can choose to create an administrator user for the team if you wish. If you don't wish to create an administrator user at this time, use the slider to select No Administrator. If you do want to create an administrator for the team, use the slider to select Super Administrator or Administrator, then complete the other fields in this section. For details about what each security role can do in Workplace, hover over the |
- Click the Create Team button.
NOTE For much, much more information about managing teams, please refer to Create or edit a team.


