EXAMPLE The information in this topic is intended for Workplace administrators tasked with setting up and managing a Workplace implementation.
NOTE Please be sure to fully review our Getting started: Projects and Getting started: Implementation topics before proceeding with this supplementary guide.
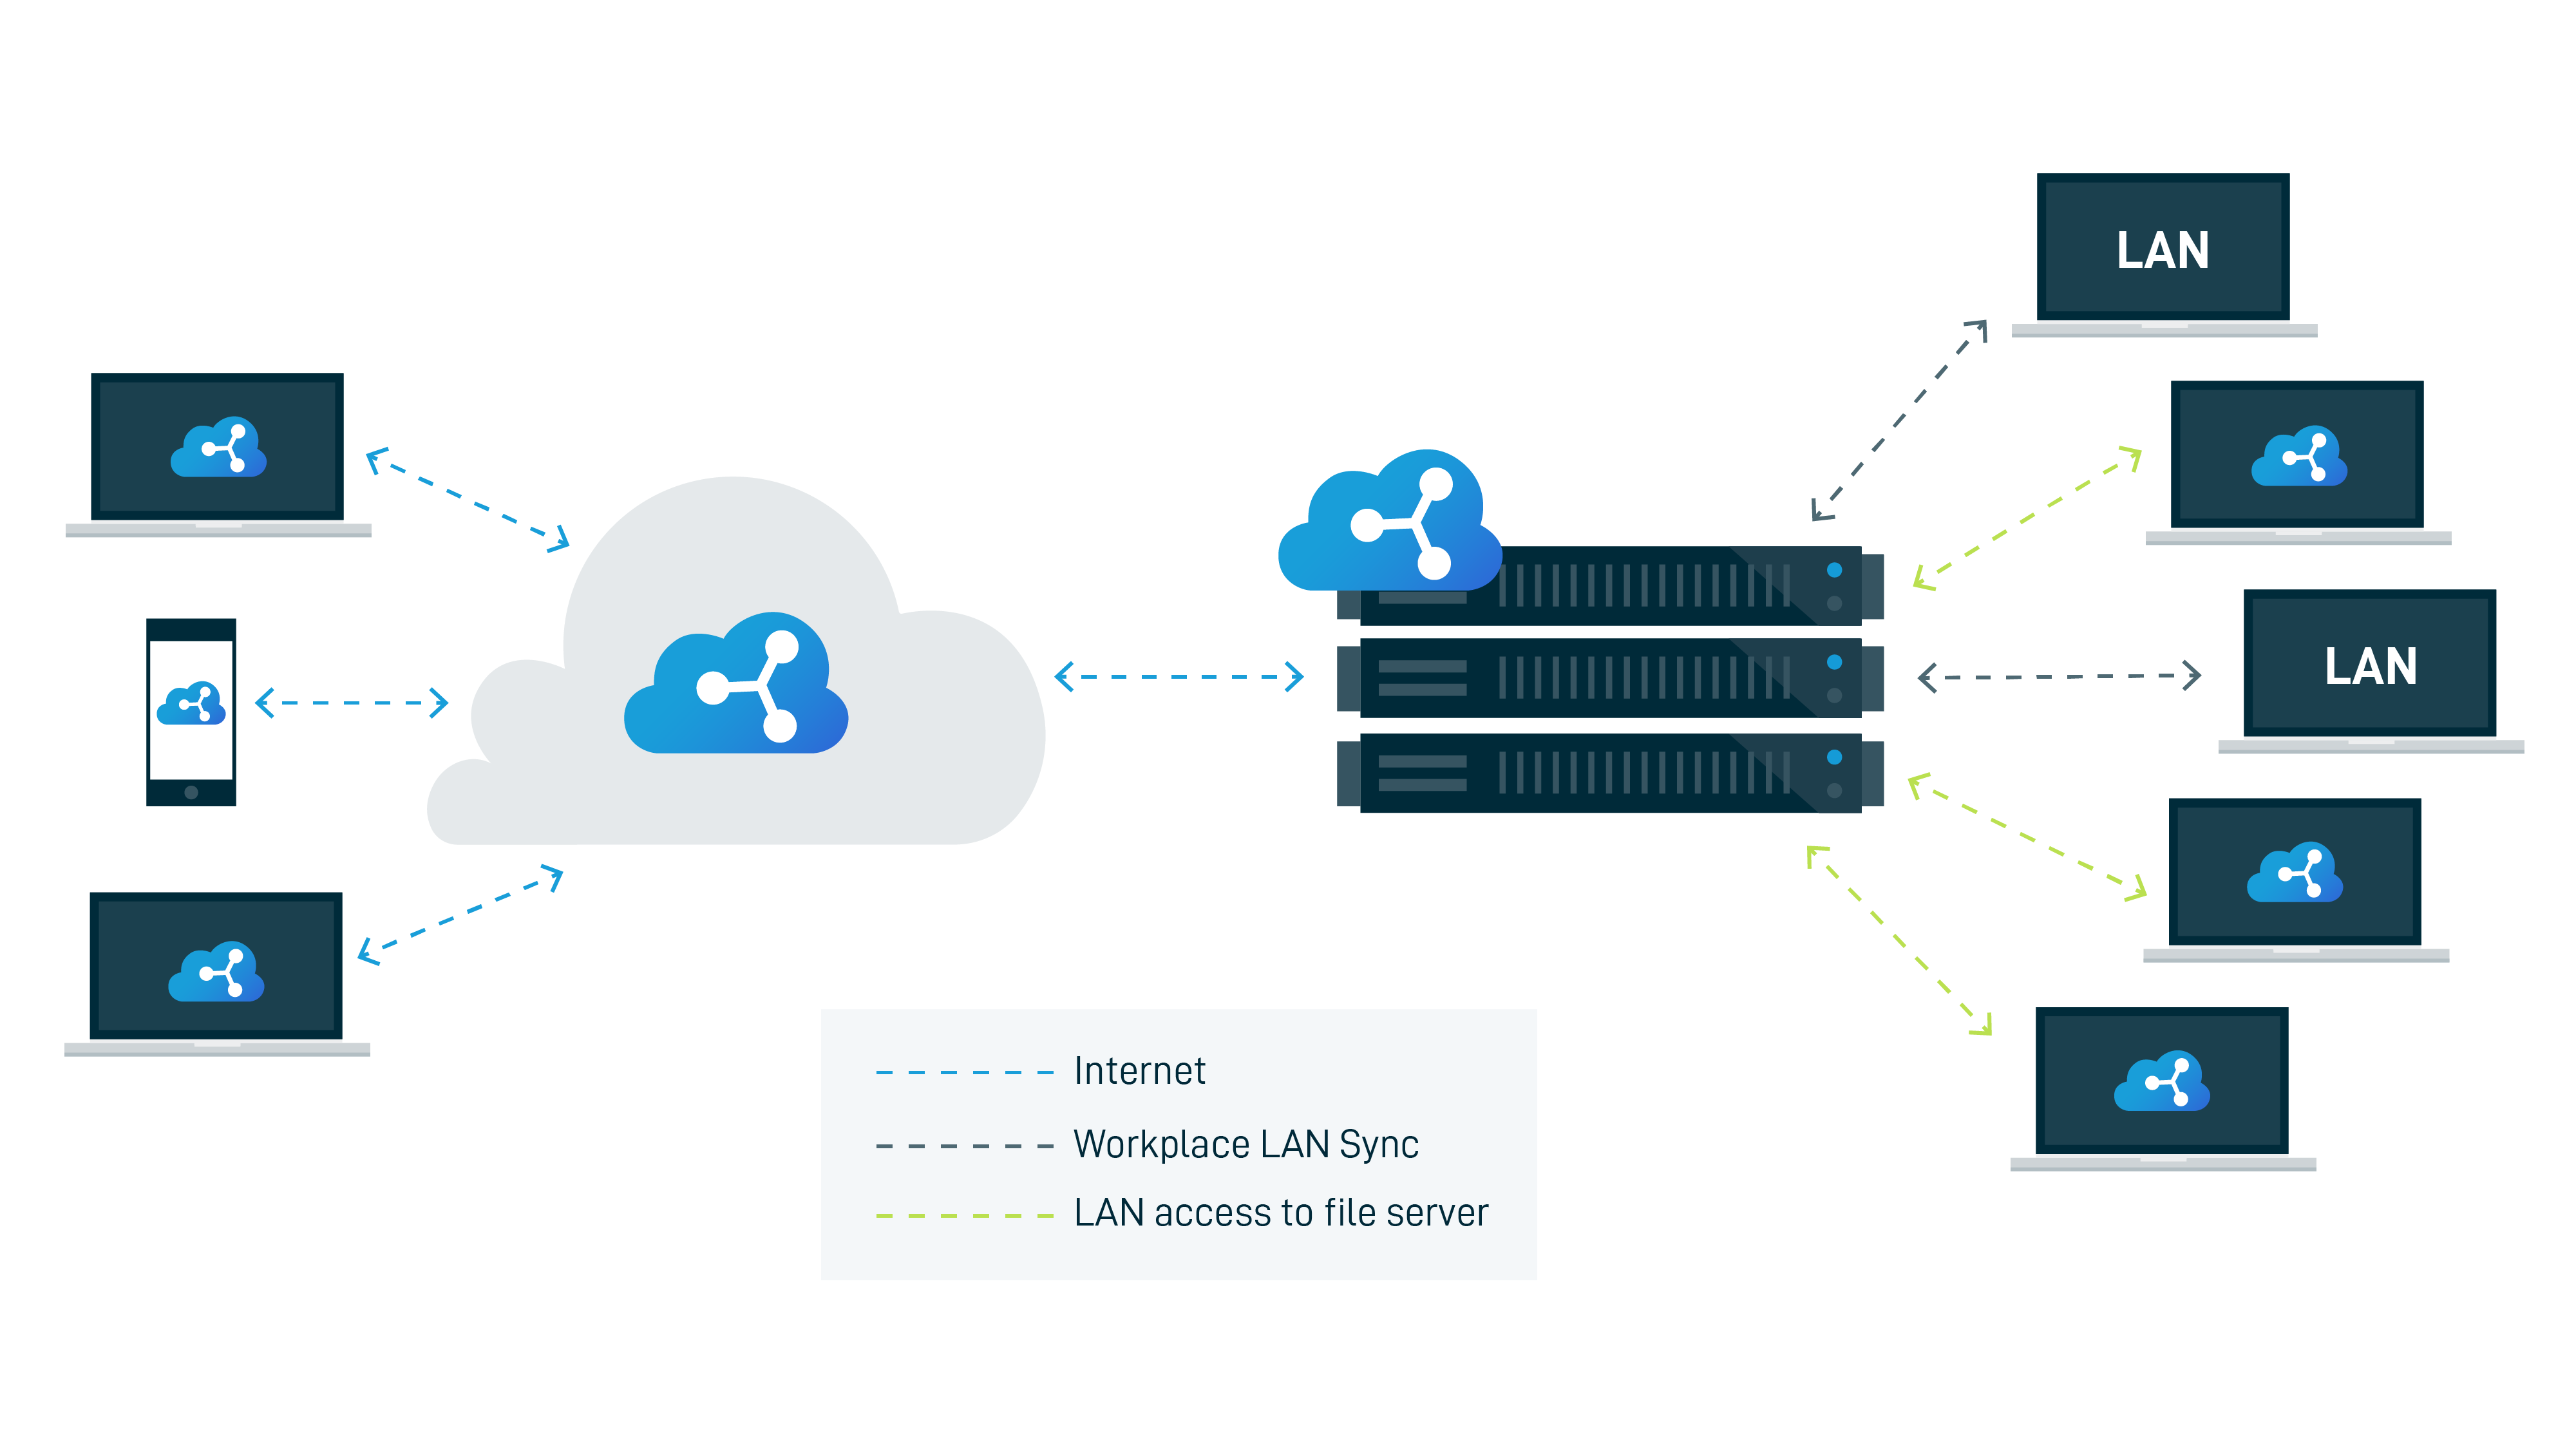
The Workplace hybrid model allows you make all your files accessible via Workplace and also retain a local, centralized data storage to make the data set available via the local network. The Workplace service keeps all the data on the local storage both accessible internally and in sync with Workplace.
Workplace Server
Workplace Server must be installed on the LAN to facilitate syncing between the local file server and Workplace.
Please review the Workplace Server Requirements before proceeding.
The requirements have a direct correlation to usage (and thus throughput). For smaller deployments with low to moderate throughput, the recommended specifications should be more than adequate. A large scale deployment with a high numbers of Workplace users and frequent file activity (uploads/downloads/modifications) may need more powerful hardware and/or multiple Workplace servers.
Additionally, note that other processes running on the machine hosting Workplace Server may mean Workplace Server has insufficient resources to operate optimally.
Workplace Server needs very good throughput to the local storage! If feasible, install Workplace Server on the local file server. Alternatively, we recommend installing Workplace Server on a dedicated machine with very good throughput to your file server.
Internet Connection
A good connection is critical! Again, the requirements correlate with throughput. Take into consideration that, on top of the current Internet traffic, Workplace Server will be transferring (potentially) large amounts of data. As a rough guide, we’d recommend a minimum in the range of 10-50 Mb/s (up and down), dependent upon the line quality.
Workplace requirements
An administrator account within the Workplace Team.
NOTE To sync projects to Workplace Server, the projects must first be shared with the Workplace Server. Learn more in Manage project, folder, and file team shares.
- You have defined the priority in which to sync projects.
- You have confirmed that the data structure is in compliance with the guidelines defined in Getting started: Projects.
- The Windows user account under which Workplace Server service will run has full access permissions to the entire folder structure on your file server.
- Machine(s) designated to host Workplace Server.
- You have confirmed that Workplace Server and connection requirements have been met.
- You have credentials for the Workplace administrator account.
Install Workplace Server as described in Install or uninstall Workplace Server
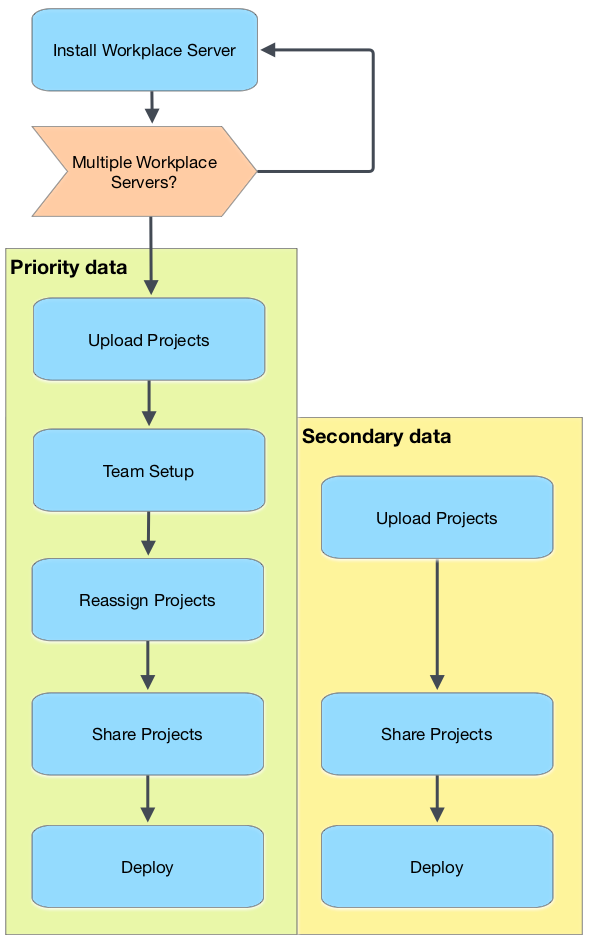
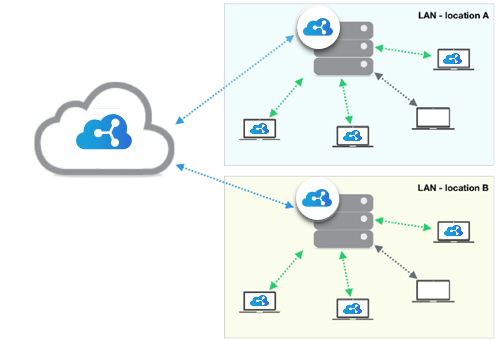
Multiple file server agents can be installed to provide local redundancy or spread the resource requirements over several machines. Simply follow the installation process for each Workplace Server instance.
Setting up multiple Workplace Servers for redundancy purposes is typically performed when different geographic locations require the same data sets to remain in sync. If the data already exists in each location, you can use the Merge function in the Workplace Server: Folder Sync tab to get all the Workplace Servers in sync very rapidly. If the data does not exist in all locations and if the data set is large, you may wish to take advantage of the Project Loader.
For redundancy in a single location, we recommend performing a local, scheduled backup.
Multiple Workplace Servers may offer improved performance, particularly in teams with extremely high data throughput - either a large number of users accessing the service or a large amount of data being created or changed, or a combination of the two. As Workplace server can only transfer a certain amount of data in a time frame, heavy usage can cause delayed syncing as Workplace Server works through the queue of pending items. By deploying multiple Workplace servers and assigning each to a subset of the data, the load can be balanced and, thereby, performance improved.
As each scenario will be unique, this process requires a good understanding of the team's workflow and which projects are most frequently used or have large data changes occurring. It may also require some trial-and-error to optimize load-balancing.
The basic principle is to spread the projects across multiple Workplace servers, ensuring the high-throughput projects are on different Workplace servers.
EXAMPLE For example, if we had projects A, B, C, D, E and F, where A, C and D where high-throughput projects, ideally we would install 3 Workplace servers. The first Workplace server would host projects A and B, the second, projects C and E and the third projects D and F. In this way each Workplace server would be responsible for syncing a single high-throughput project and one lower throughput project.
Depending on the throughput, two Workplace servers may suffice. In this scenario, projects A, B and C would be hosted by one Workplace server and projects D, E and F hosted by the second. Should the load be two heavy on the first Workplace server (hosting two of the high-throughput projects), the performance and workflow should be evaluated and the hosting of the projects redistributed to efficiently balance the load.
Because Workplace Server is responsible for linking the data on the file server to the Workplace service and does not actually host the data, it’s a relatively easy process to disassociate the project from one Workplace server and associate it with another. Simply Unsync Project on the current hosting Workplace server, then Merge Project on the new hosting Workplace server. As the files are already in place, Workplace Server only needs to link the files together - it will not need to upload or download any files (other than changes made during this process).
For more information about syncing and unsyncing, refer to Workplace Server: Folder Sync tab.
Proceed to upload the data to the Workplace service by adding projects via Workplace Server: Folder Sync tab.
You may wish to add project owners to your team at this point (see Add a user), as you need to define the project owner when creating a project. Alternatively, you can set the primary administrator account as the owner and reassign the project in step 4.
Focus on uploading your highest priority projects, as determined in your Checklist, first. Less critical projects can be uploaded and shared in conjunction with subsequent steps or at any point.
Upload progress can be monitored from the Progress window.
While the data is uploading, you can proceed to setting up the Workplace team. We recommend waiting to create users until the primary data is fully uploaded, with the possible exception of the project owners.
Set user defaults and policy defaults
Set your User Defaults and Policy Defaults.
NOTE You may wish to enable the Suppress Welcome Emails policy if you plan to do further configuration and/or silently install the Workplace app prior to sending out welcome emails. You may always resend welcome emails from the User details page, or from the right-click menu on the Users page.
Create users
This is usually the best time to create users. If you are using groups effectively, you can add the users at a later point and add them to the appropriate groups, which in turn will assign the policy profiles applied to the groups they are added to and grant access to the projects shared with those groups.
Create users according to the instructions in one of the following topics:
- Add a user
- Active Directory integration guide, if the Active Directory integration is enabled.
TIP To learn how to add multiple users at once, refer to Import users.
TIP Users can be created as copy of another user, reducing the time to configure each user. Refer to Create new users by copying an existing user.
For information about the different user types and what they can see and do in Workplace, refer to User types.
After users have been added, they will receive an email with instructions on how to activate their accounts (unless the Suppress Welcome Emails policy is enabled).
Create groups
Create Groups to make sharing and administration of the team easier!
Create and assign policy profiles
Now that the users and groups are created, proceed to create and assign Policy Profiles.
If the projects were assigned to the primary administrator in step 2, reassign the projects to their respective owners - see Project Detail for more information.
Share projects with users and groups in accordance with the Getting started: Projects guide.
Find out more about sharing projects in Manage project, folder, and file team shares.
This sequence of the deployment steps will depend on the scenario and, in particular, at which stage you have (or want to) welcome the users to the team. Proceed with the steps below in the sequence that works best for the scenario.
Welcome users
Unless the Suppress Welcome Emails policy was enabled, users will already have received the welcome email and, most likely, activated their accounts.
Upon activation, the Workplace app will automatically download. Users can also download the appropriate (Windows or Mac) version of the Workplace app from the Devices tab.
If the welcome emails were disabled via policy, you can now forward the activation link to the users. If desired, remember to disable the Suppress Welcome Emails policy.
NOTE Account activation links automatically expire after one week. If necessary, you may always resend the welcome email to a user from the User details page, or from the right-click menu on the Users page.
Install the Workplace app
While users can manually install the Workplace app, you may wish to perform a Silent installation. Additionally, you can silently configure the Workplace app via the Deployment feature.
NOTE The deployment feature means that users will receive an email in which they need to approve the device and accept the EULA. Take this into consideration in regards to sequencing when the send the welcome emails.
Educate users
Each teams needs will be unique and user education should be focused on the features most needed by the team.
We strongly recommend all users that will own projects review the Getting started: Projects guide.
IMPORTANT Users who are new to cloud syncing services may not understand that if they delete folders or files locally, those files or folders will be deleted from Workplace and, subsequently, from all other users with whom the deleted data was shared. While this should be minimized with effective use of the permissions, we recommend that you ensure that users are familiar with this concept.


