PERMISSIONS Administrator or Super Administrator privileges in Workplace
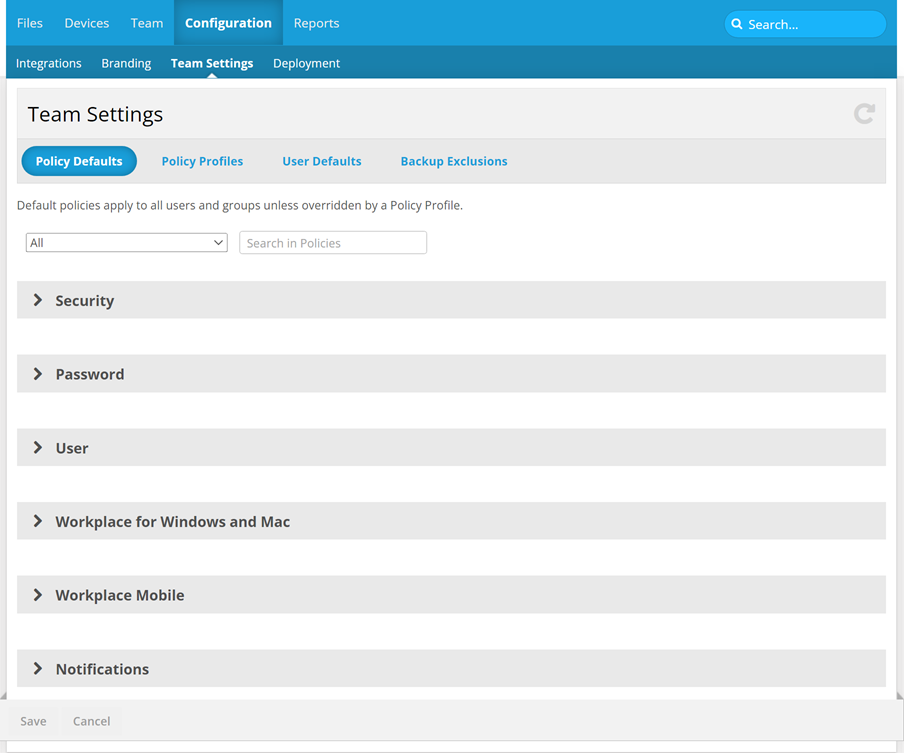
NAVIGATION Workplace Online > Configuration > Team Settings > Policy Defaults
About policies and policy profiles
Policies control all the configurable behaviors and features in Workplace. Policy defaults, which you control on this page, are applied to all users and groups unless overridden by a policy profile.
Policy profiles are sets of individual policies. You can create and apply additional profiles on the Policy Profiles page to further define security and functionality for different users or groups of users. But if you don't, the policies you define here on the Policy Defaults page will apply to all your users.
Understanding, applying, and configuring individual default policies
The areas below describe how to enable and configure specific policies, and how those policies will affect users who are only associated with the default policy set.
| Policy | What it does | How to apply it |
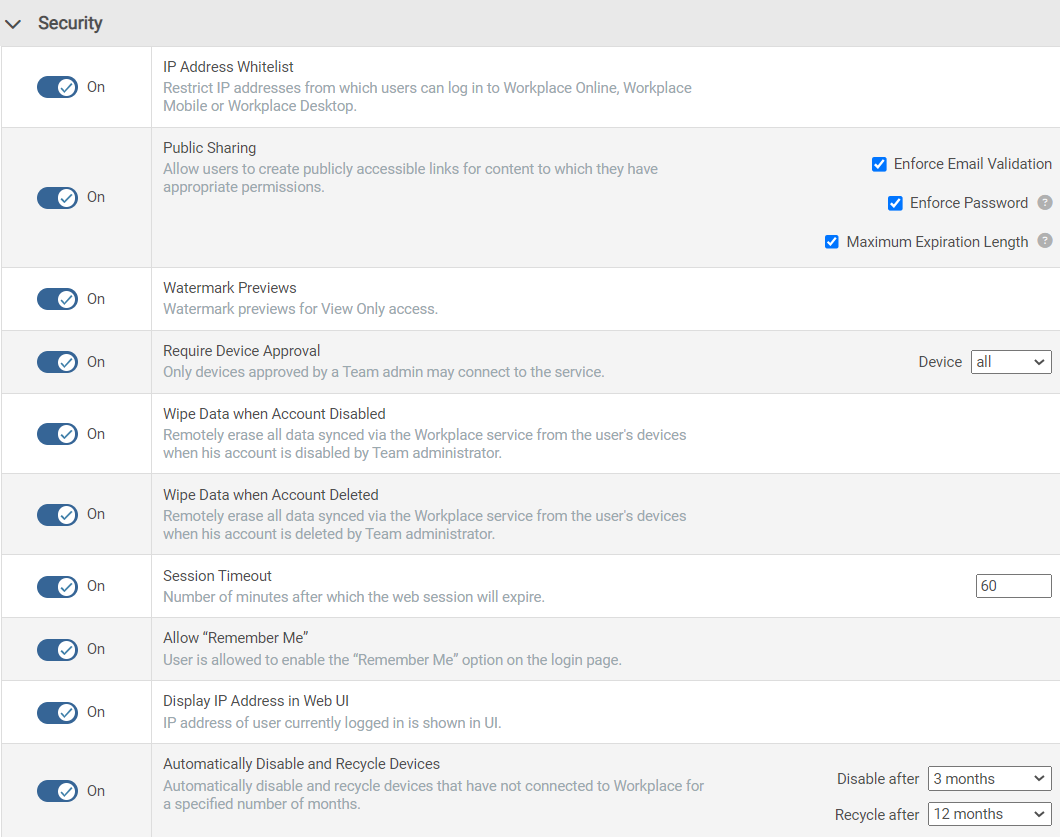
| IP Address Whitelist | Restricts log in via a web browser, Workplace Mobile or Workplace Desktop to specified IP addresses. |
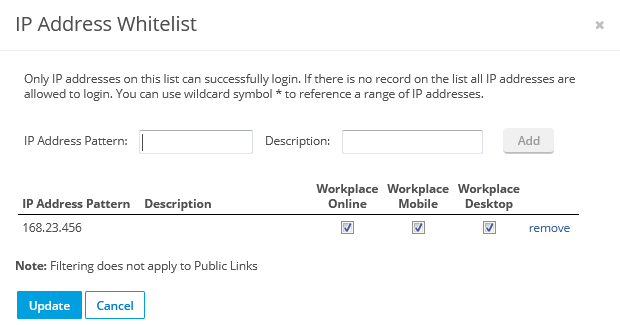
Toggle the switch to On. By default, users will be able to log in to any component of Workplace from an IP address on this list. To exclude login to some Workplace components, you may clear the Workplace Online, Workplace Mobile and/or Workplace Desktop check boxes for any IP address. You can use wildcard symbol * to include a range of IP addresses. TIP Wildcards are implemented in a very simple way. Just use one or more asterisks in the pattern. An asterisk will replace 0 or more characters
|
| Public Sharing | Allow users with the correct permissions to create Public Shares to content stored in the service. |
Toggle the switch to Enable. Select check box. When this policy is added to the policy profile, you can choose to enable any or all of the following additional settings: Enforce Email Validation Public share recipients will be prompted to enter their name (optional) and email address (required) when they access the share. Enforce Password Requires that public share recipients enter a password before accessing the file. Maximum Expiration Length Determines the maximum amount of time that the share is available. You may select a duration. Users to whom this policy profile applies will be able to adjust the duration downward, but they will not be able to increase it. |
| Watermark Preview |
Places a watermark on files are viewed with View Only permissions. The watermark consists of the user's full name and email address. This only applies to converted files, not images or videos. Refer to File conversion limits for more information on which file types are converted. |
Toggle the switch to Enable. |
| Require Device Approval | Devices require approval by a team administrator before the user may connect to the service. | Toggle the switch to Enable, then select the type of device that requires approval (mobile or desktop), or select all to require approval for all devices. |
| Wipe Data when Account Disabled |
Remotely erase all data synced via the Workplace service from the user's devices when their account is disabled. If this policy is enabled, the Disable and Wipe Devices option is selected by default when you disable a user. When a device is wiped, it is also purged. NOTE If Active Directory integration is enabled and a user is disabled via Active Directory, the synced data in the Workplace Folderwill be automatically wiped from all their devices. |
Toggle the switch to On. |
| Wipe Data when Account Deleted |
Remotely erase all data synced via the Workplace service from the user's devices when their account is deleted. When this policy is enabled and a user account is deleted, the default Don’t Wipe option next to each device is changed to Wipe. When a device is wiped, it is also purged. NOTE If Active Directory integration is enabled and a user is deleted via Active Directory, the synced data in the Workplace Folder will be automatically wiped from all their devices. |
Toggle the switch to On. |
| Session Timeout | Number of minutes after which a web session will expire. | Toggle the switch to On, then enter the number of minutes. The default value for this field is 60. |
| Allow "Remember Me" | Users are allowed to select the "Remember Me" option on the Log In page. | Toggle the switch to On. |
| Display IP Address in Web UI | IP address of user currently logged in is shown in UI. | Toggle the switch to On. |
| Automatically Disable and Recycle Devices | Automatically disables devices that have not connected to Workplace for a specified number of months, and recycles devices the have been disabled for a specified number of months. |
If this policy has been disabled, toggle the switch to On. An email notification will be sent to team administrators and the device owner whenever a device status changes due to this policy. |
| Policy | What it does | How to apply it |
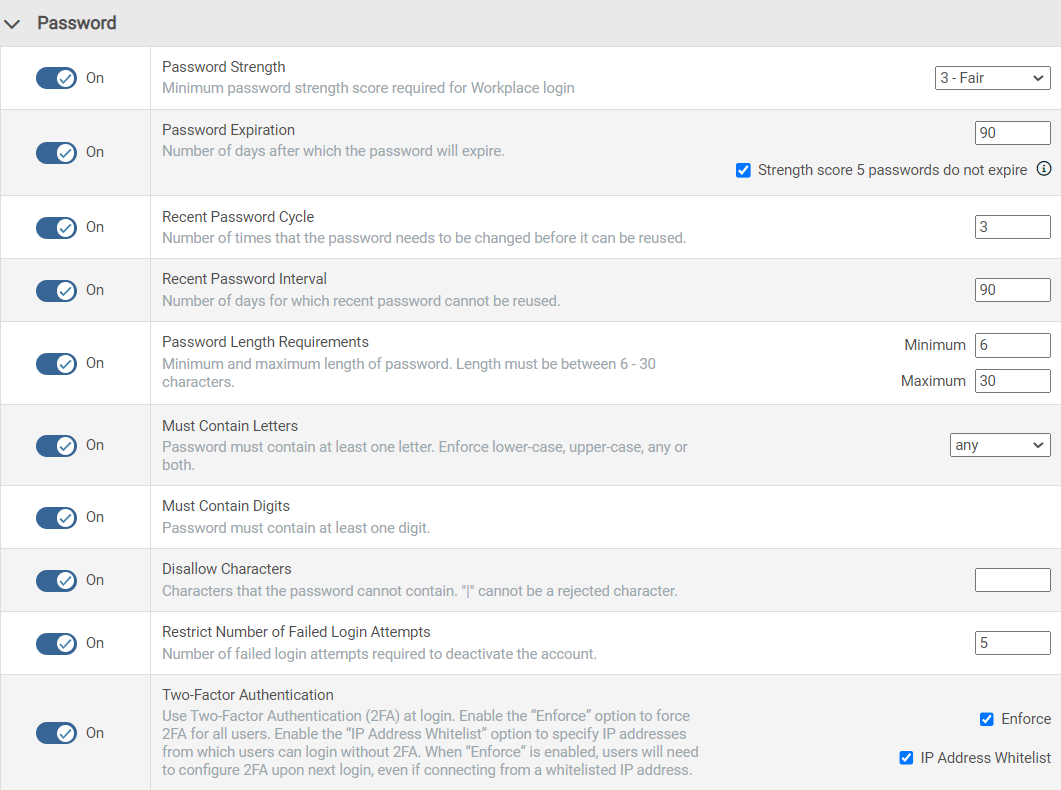
| Password Strength | Minimum strength required when users create their passwords. | Toggle the switch to On, then select a minimum password strength. |
| Password Expiration | Number of days after which the password will expire. Optionally allows prevention of password expiration for password with a strength of 5, even when password expiration is enabled. |
Toggle the switch to On, then enter the number of days. Optionally select the Strength score 5 passwords do not expire check box. |
| Recent Password Cycle | Number of times that a password must be changed until it can be reused. | Toggle the switch to On, then enter the number of cycles. |
| Recent Password Interval | Number of days for which recent password cannot be reused. | Toggle the switch to On, then enter the number of days. |
| Password Length Requirements | Sets the minimum and maximum length of passwords. | Toggle the switch to On, then enter a minimum number and/or a maximum number. The range is 6-30. The default value for the Minimum field is 6. The default value for the Maximum field is 30 |
| Must Contain Letters | Password must contain at least one letter. | Toggle the switch to On, then select the type of letter requirement you want to enforce: any, upper case, lower case, both. |
| Must Contain Digits | Passwords must contain at least one digit. | Toggle the switch to On. |
| Disallow Characters | Characters that passwords cannot contain. | Toggle the switch to On, then enter the characters you do not want to allow users to include in passwords. '|' cannot be a rejected character. |
| Restrict Number of Failed Login Attempts | Number of failed login attempts required to deactivate the account. | Select the check box, then enter a number. The default value for this field is 5. |
| Two-Factor Authentication |
Use two-factor authentication in the login process. For more information, refer to Manage Two-Factor Authentication |
Toggle the switch to On, then click Save and proceed to Additional 2FA Settings, below. |
| Additional 2FA Settings | ||
| Enforce (only available when Two-Factor Authentication check box is selected) |
2FA is mandatory unless explicitly disabled for that user. Refer to Manage Two-Factor Authentication. There will be no grace period during which users may skip 2FA. New users added to the team will also have 2FA enforced. |
After you enable the 2FA policy and save, a Manage link will appear next to this setting. Click the Manage link to open the Manage Two-Factor Authentication page and complete configuration of this policy.
|
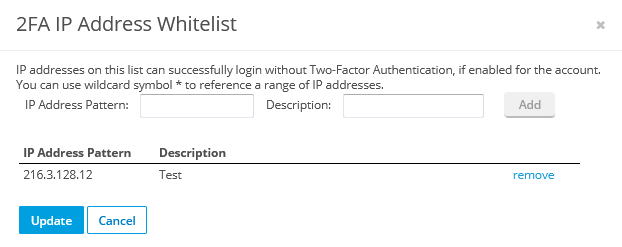
| IP Address Whitelist (only available when Two-Factor Authentication check box is selected) |
Allow IP addresses that can log in without two-factor authentication. *Workplace Desktop installations will always ask for 2FA even when coming from a whitelisted IP. |
After you enable the 2FA policy and save, a Manage link will appear next to this setting. Click the Manage link, which will open this popup window: TIP Wildcards are implemented in a very simple way. Just use one or more asterisks in the pattern. An asterisk will replace 0 or more characters
When you have added all the addresses you want, click Update. |
| Policy | What it does | How to apply it |
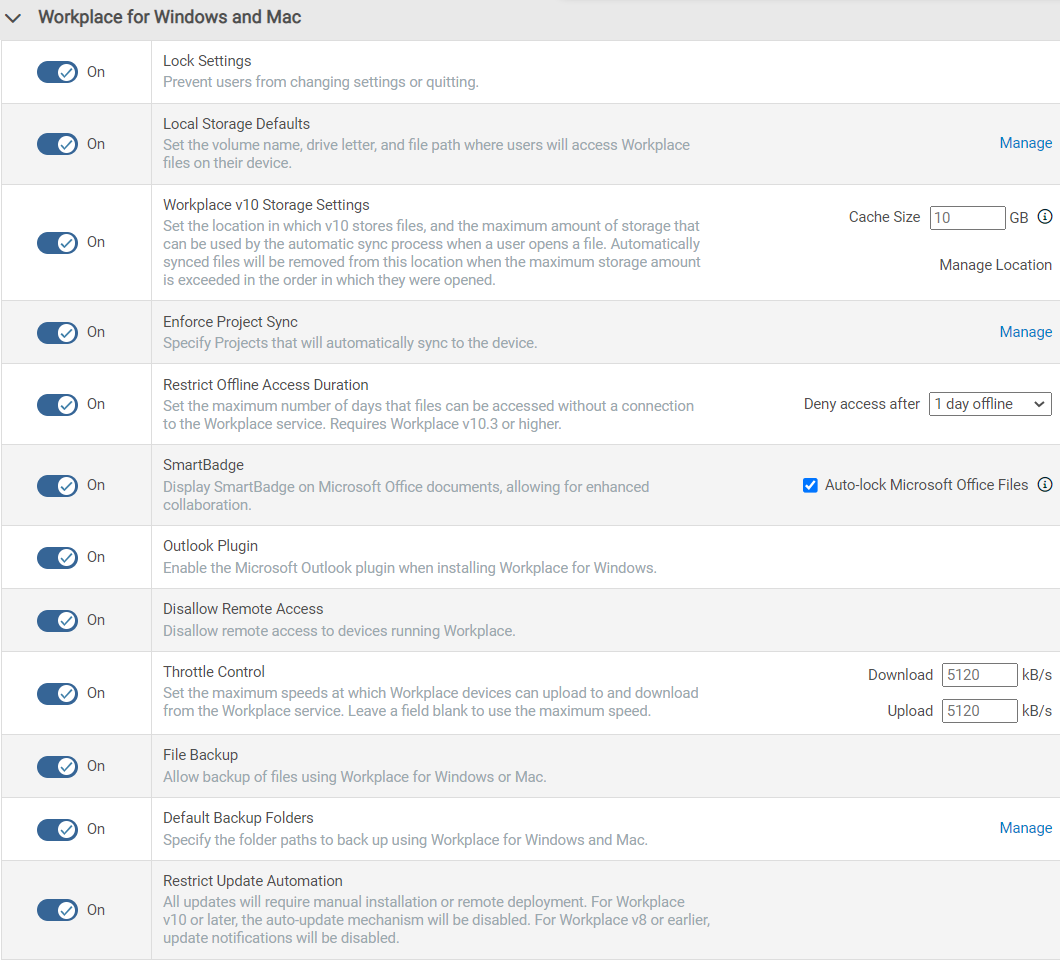
| Lock Settings | Prevents users from being able to make changes to settings and quitting. Users with this policy applied will not be able to control their sync preferences, backups, and networks settings via Workplace Desktop. | Toggle the switch to On. |
| Local Storage Defaults | Set the volume name, drive letter, and file path where users will access Workplace files on their device. |
Toggle the switch to On. Then click the Manage link for this policy to set the default location for the Workplace folder on the Manage Workplace Location page. |
| Workplace v10 Storage Settings |
Specifies the location in which v10 stores files, and the maximum amount of storage that can be used by the automatic sync process when a user opens a file. Files that are opened on the device will automatically be retained in this cache and will be available while offline until the cache is full. Files opened the longest time ago will be automatically cleared from the cache. NOTE All files are stored in the cache location. Files that have been synced to the device to make them available offline are not included in the cache size. |
Toggle the switch to On. Then, for cache size, enter a value of 10 GB or greater in the corresponding field. To manage the cache location, you must first click the Save button at the bottom of the page. Then click the Manage Location link. This will open the Manage Cache Location interface. |
| Enforce Project Sync |
Specify projects or folders that will automatically sync to the device. If this policy is enabled, the Project list controlled by administrator check box on the Workplace Desktop Sync tab will be selected by default upon installation, but users may clear the check box to customize the projects they wish to sync. If they select the check box again, only projects designated in this policy will be synced. |
Toggle the switch to On, then click the Manage link for this policy to open the Manage Projects to Sync page and designate which projects and/or folders will sync. |
| Restrict Offline Access Duration | Sets the maximum number of days that files can be accessed without a connection to the Workplace service. Requires Workplace v10.3 or higher. | Toggle the switch to On, then select a time period from the Deny access after dropdown. |
| SmartBadge | Displays SmartBadge on Microsoft Office documents, allowing for enhanced collaboration. | Toggle the switch to On. The Auto-lock Microsoft Office Files check box enables automatic locking of Microsoft Office files when edited and automatic unlocking when closed. This check box is selected by default, but you may clear it if you wish. |
| Outlook Plugin | Determines whether the Workplace Outlook plugin is enabled by default upon installation. |
Toggle the switch to On. |
| Disallow Remote Access | Disable remote access to devices running Workplace. | Toggle the switch to On. |
| Throttle Control | Enable to set the maximum speeds at which Workplace devices can upload to and download from the Workplace service. Leave a field blank to use the maximum speed. Users can, via the Workplace app Network tab, reduce transfer speed, but they cannot increase it beyond the limit you've set here if this policy is enabled. NOTE Throttle control settings apply to Workplace Desktop 7.2 and later only. These settings do not affect Workplace Server. |
Toggle the switch to On, then enter the maximum download and upload speeds in the fields provided. |
| File Backup (metered plans only) |
Allows backup of files using Workplace for Windows and Mac. |
Toggle the switch to On. |
| Backup Folders (metered plans only) |
Allows you to specify the folder paths to back up using Workplace for Windows and Mac.
If this policy is enabled, the Backup paths controlled by administrator check box on the Workplace Desktop Backup tab in Workplace Desktop will be selected by default upon installation, but users may clear the check box to customize the folders they wish to back up. If they select the check box again, only paths designated in this policy will be backed up. |
Toggle the switch to On. Click the Manage link for this policy to open the Manage Backup Folders page and designate which folders will be backed up. |
| Restrict Update Automation |
All updates will require manual installation or remote deployment. For Workplace for Windows and Mac v10 or later, the auto-update mechanism will be disabled. For Workplace v8.x or earlier, update notifications will be disabled. If, however, the installed version is no longer supported, it will still be updated automatically. This safeguard is in place to ensure that users always enjoy a functional Workplace experience. IMPORTANT While we encourage you to use Silent installation, we recommend that you allow Datto to maintain user versions through the auto-update mechanism. This will ensure that users always have an up-to-date version of our Workplace app. Please do not enable this policy unless you have an exceptionally good reason. |
Toggle the switch to On. |
| Policy | What it does | How to apply it |
|
Send Storage Alert Emails to Admins Only
(metered plans only) |
Emails about user quotas will be sent only to team administrators. For more information, refer to Manage team storage. | Toggle the switch to On. |
| Suppress Welcome Emails | Welcome emails will not be automatically sent upon user creation. This is especially useful when deploying Workplace remotely. You may always resend welcome emails from the User details page, or from the right-click menu on the Users page. |
Toggle the switch to On. |
How to...
To locate a specific policy, you can:
-
Filter policies by group, using the dropdown menu
-
Begin typing the name of the policy you wish to find in the Search in Policies field
-
Use the filter and search field together, as illustrated below. The policies list will automatically update to match your query, and any search terms will be highlighted in the results:

-
Locate the policy you wish to enable or disable.
-
Toggle the Enable/Disable switch.
-
Optionally, Modify policy settings. For individual policy details, refer to Understanding, applying, and configuring individual default policies, above.
-
Click Save.
- Locate the policy whose settings you wish to modify.
- Make any necessary adjustments to the policy. For individual policy details, refer to Understanding, applying, and configuring individual default policies, above.
- Click Update.
NOTE Some policies can be further managed or modified on policy-specific pages. For these policies, click the Manage link, then make and save any necessary adjustments. The following policies have associated management pages:
Manage Two-Factor Authentication
Manage Backup Folders (metered plans only)
Manage Projects to Sync
Manage Workplace LocationManage Backup Folders
